Precision Time Solutions - Help and User Guide
Welcome! This guide will walk you through the features and settings to manage your company's time and attendance effectively.
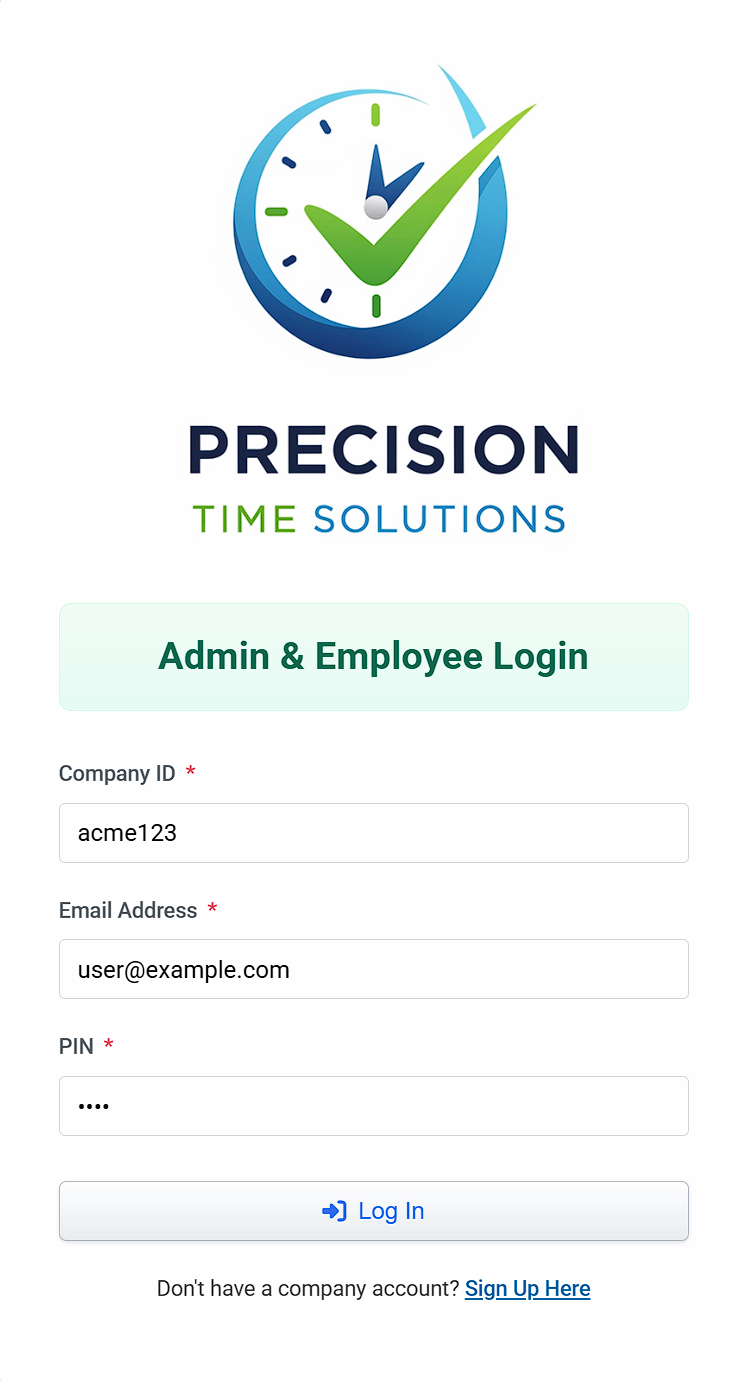
Login
This is how you log into the system.
The first time you log in, use the email address you registered with and the default PIN 1234. You will be prompted to change your PIN immediately after logging in for security purposes. PIN must be 4 digits.
If you are an administrator, you will be taken to the Employee Management page after logging in. Regular users will be directed to the Time Clock page and logged out automatically after 30 seconds of inactivity to keep terminal secured. - This is the only functionality that non-Administrators have access to.
If you have any messages, they will be displayed upon successful login.
Login Checklist:
- Company ID - Sent in welcome email or provided by supervisor
- Your e-mail address (username)
- PIN - default for new employees or PIN resets is
1234 - For mobile devices - bio-metric authentication or device lock PIN
Using the Time Clock
The main Time Clock page allows employees to punch IN and OUT. On the time card, you can also view employee details and available accrued PTO.
To use, simply click on IN or OUT to initiate a punch.
You will then be automatically logged out in 30 seconds, unless you have Administrator permissions.
Tardy punches will be shown in red
Accrued PTO is visible at the bottom of the "time card"".
Note: Successful punch is subject to restriction policies (Device, Time or Location Restrictions)

Navigating the Application
The Navigation Bar pictured below is located at the top of every page (Admin users only) and is used to access the various management functions. Some of the options have sub-menus with additional options.
You can jump to any section, form anywhere, easily using the navigation bar.

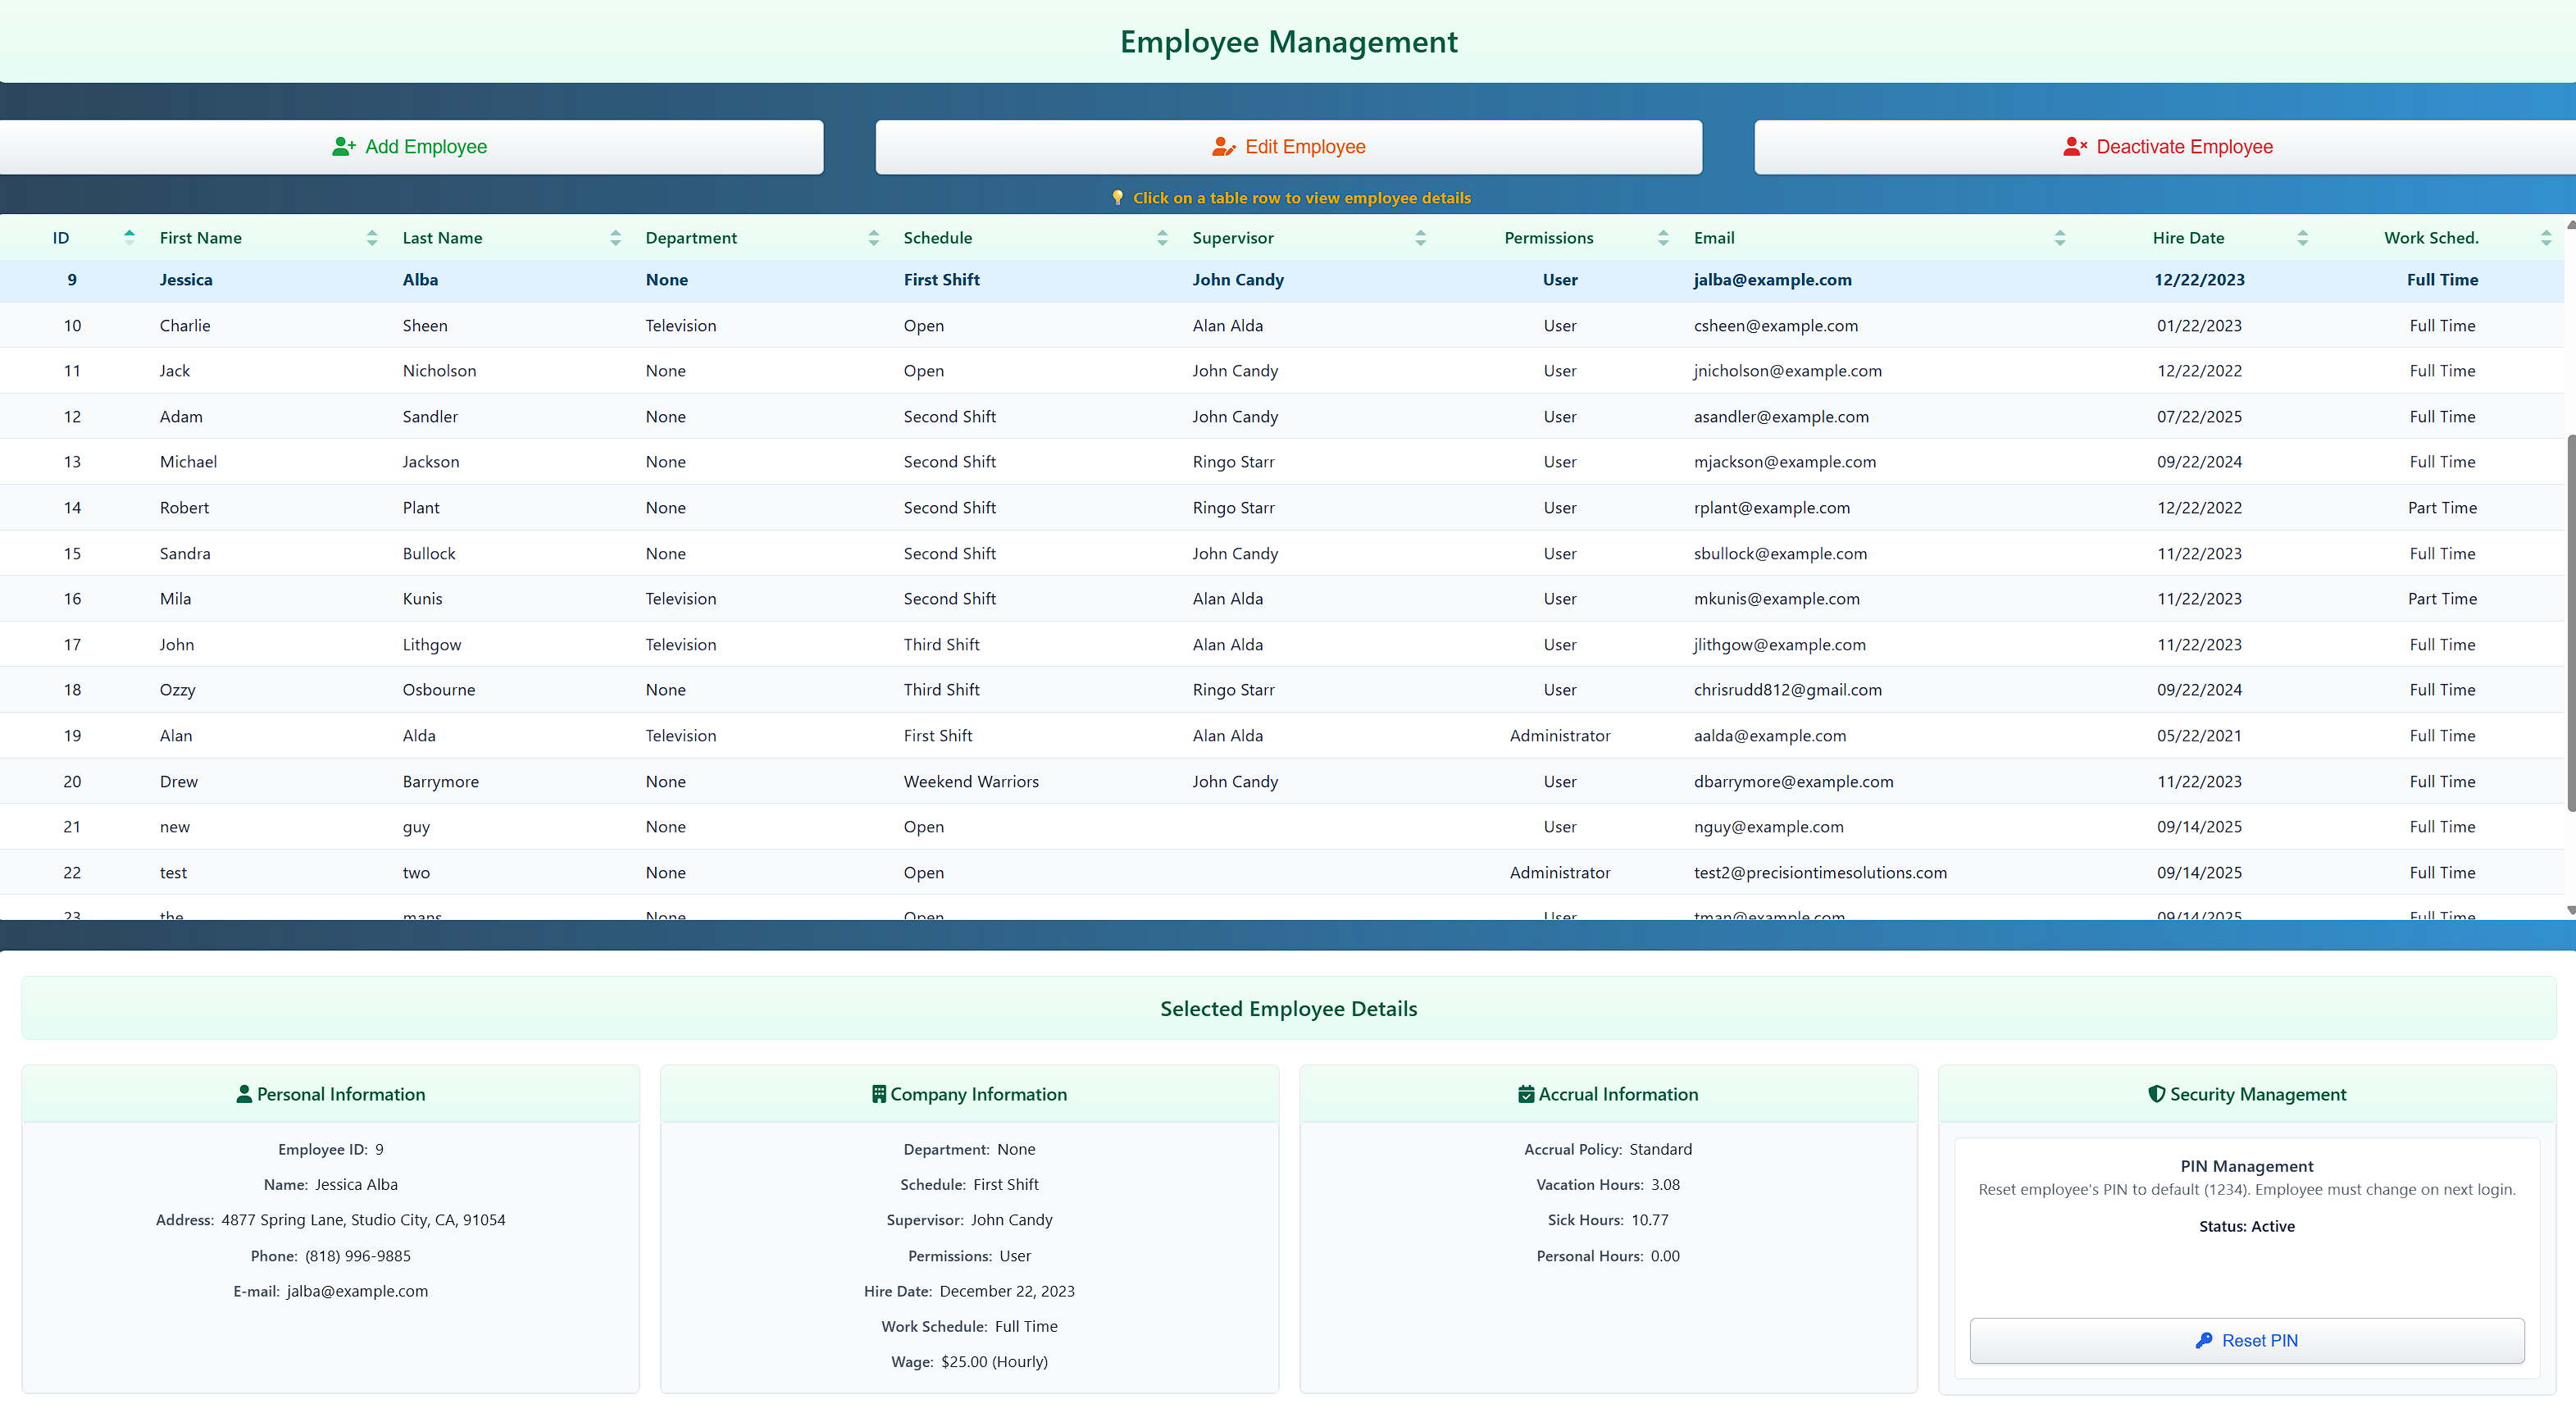
Employee Management
The Employee Management page is where you can view all active employees, add new employees, edit their information, reset PINs, and deactivate employees.
Viewing Employee Details
To view an employee's details, click on their row in the table. Their information, including accrued time balances, will appear in the "Selected Employee Details" panel.
This panel also contains the PIN Reset button, which resets their PIN to "1234" and require change at next login.
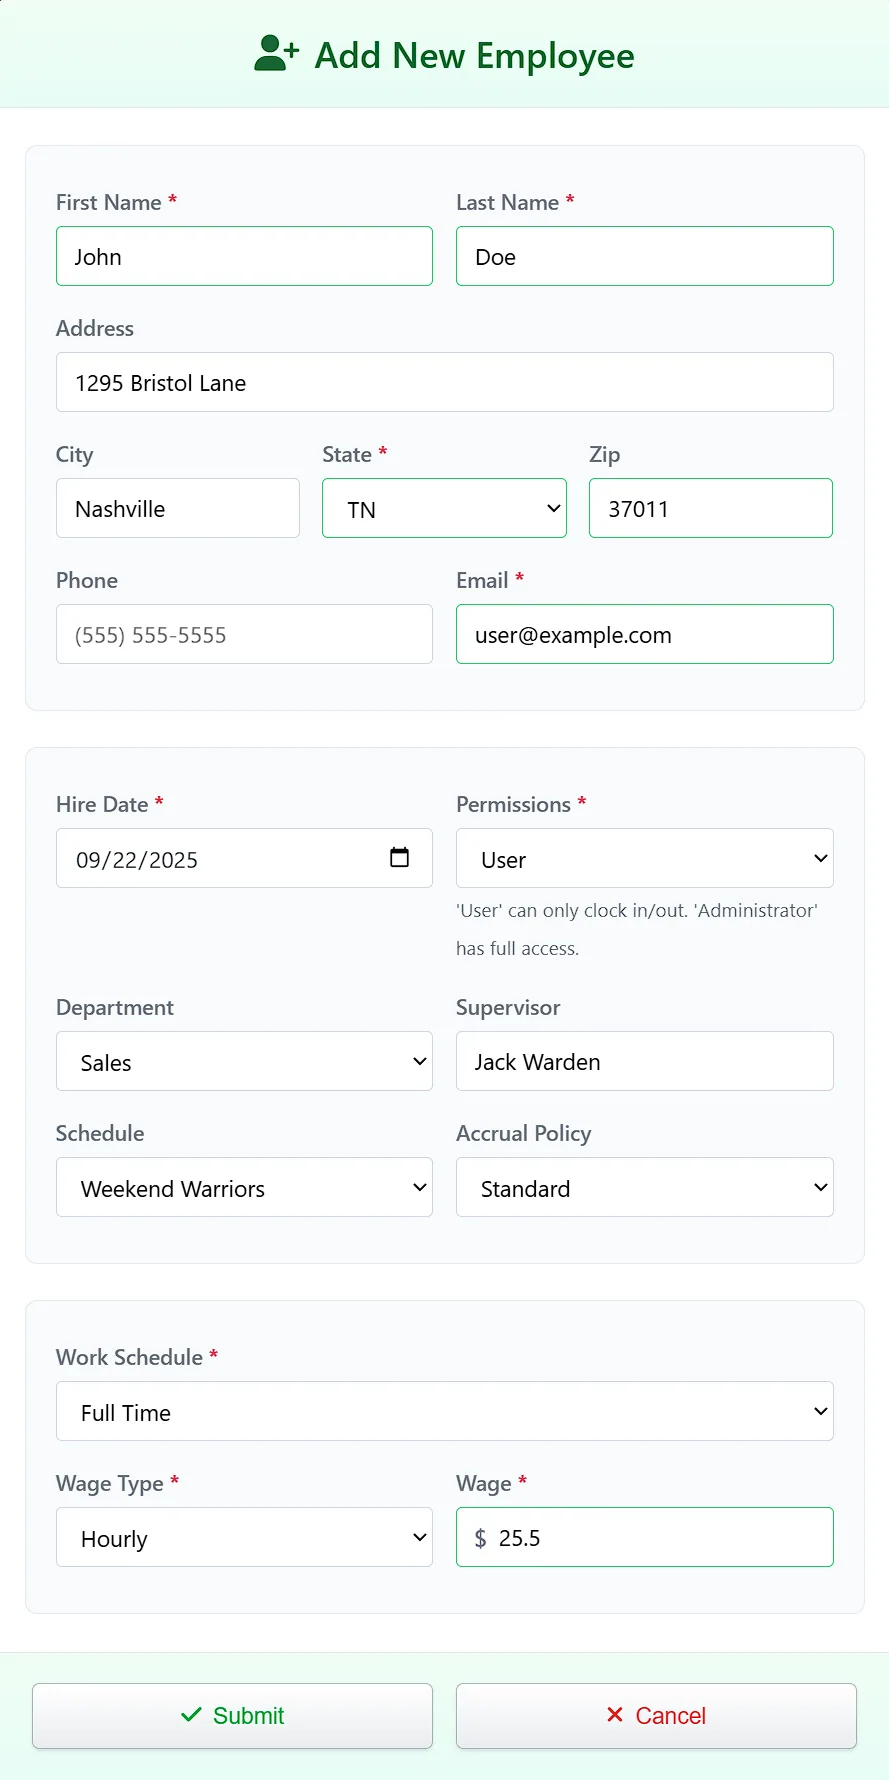
Adding a New Employee
- Click the green "Add Employee" button.
- Fill in the employee's information in the window that appears. Fields with a red asterisk
*are required. The email address serves as the user name. - Set the permissions: "User" can only access the Time Clock, while "Administrators" can access all functions.
- Complete the sections for personal info, company assignments, and wage information.
- Click "Submit" to save the new employee.
- Employee will be created with default temporary PIN (1234).
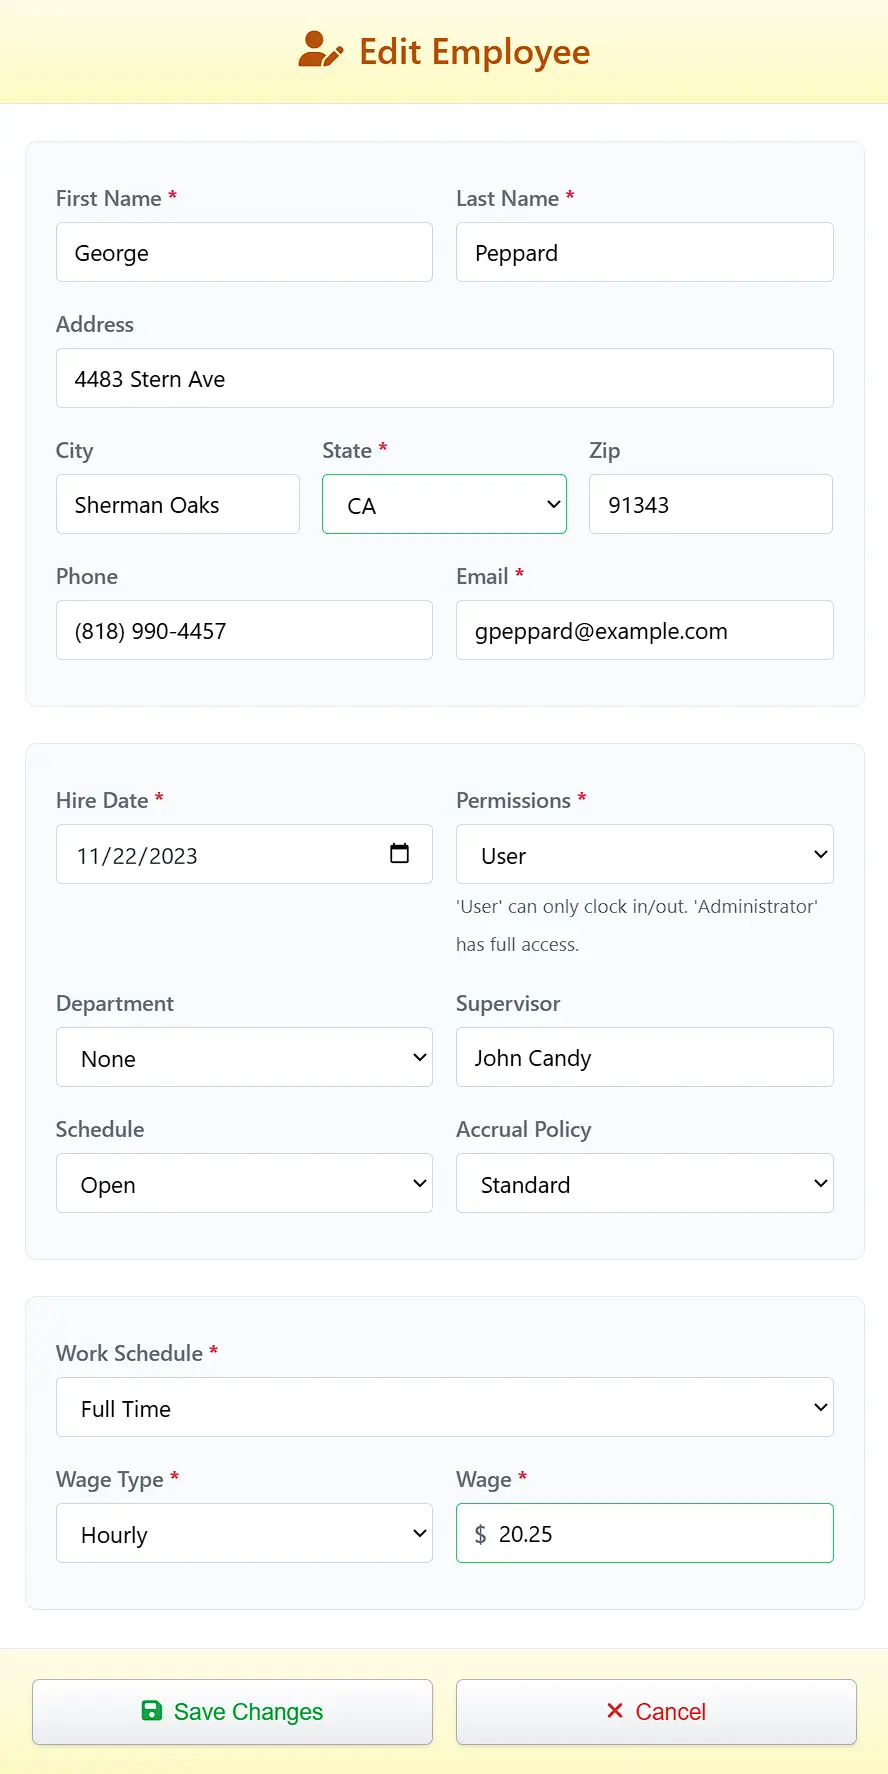
Editing an Existing Employee
- Select the employee's row in the table.
- Click the now-active "Edit Employee" button.
- In the "Edit Employee" modal, make the necessary changes.
- Click "Save Changes" to update the record.
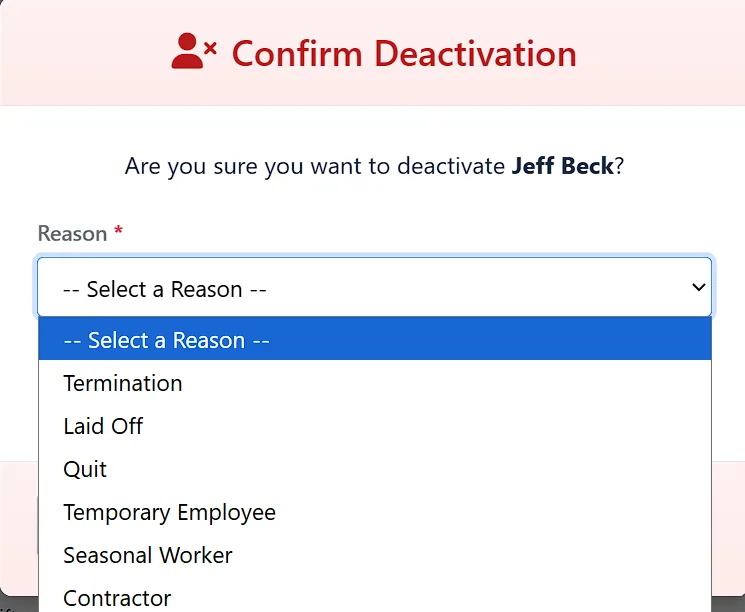
Deactivating an Employee
Deactivating an employee marks them as inactive. They will not be included in any calculations or reports except the Inactive Employees Report and can be reactivated from there (temp workers, seasonal, contractors, etc.).
- Select the employee's row in the table.
- Click the now-active "Deactivate Employee" button.
- In the confirmation pop-up, select a reason for deactivation from the dropdown list.
- Click the red "Deactivate" button to confirm.
Note: Inactive employees can be viewed and reactivated from the Reports -> Employee Reports -> Inactive Employees section.
Inactive employees do not count toward the plan's employee limit.
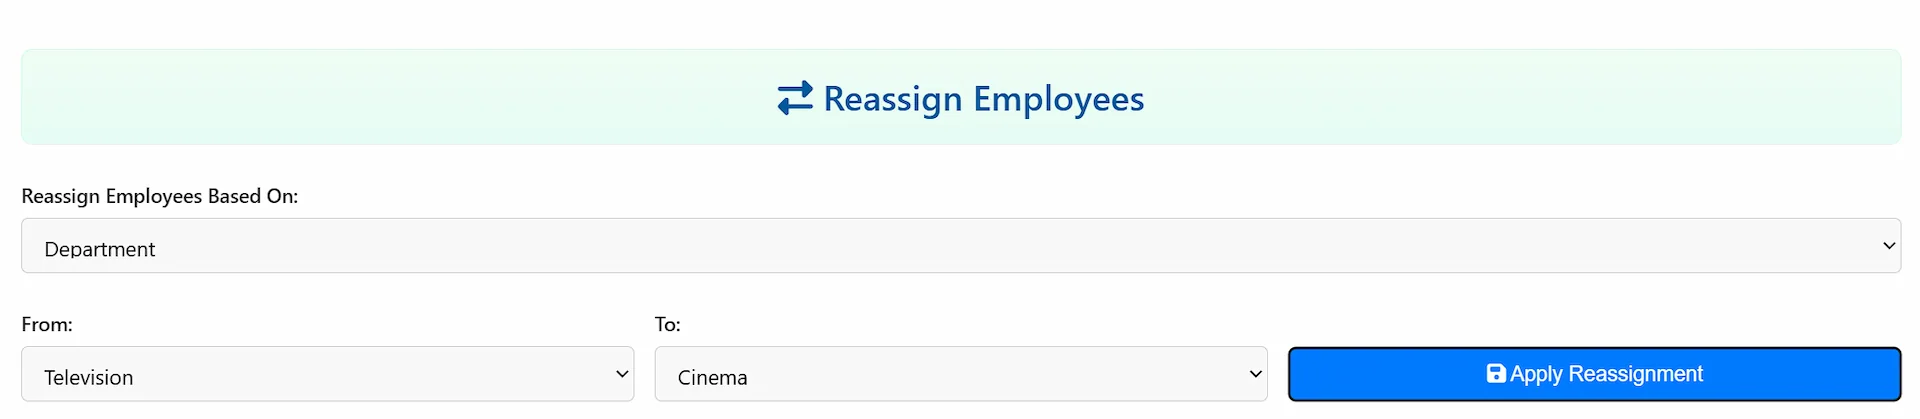
Re-Assigning Employees
While editing an individual employee is done in the edit form, you can also re-assign multiple employees to a different department, schedule, or accrual (PTO) policy in bulk.
- On the Navbar go to Employees > Re-assign Employees by >
- In the "Re-Assign Employees" modal, choose the new department, schedule, or PTO policy from the dropdowns.
- Click "Apply Reassignment" to apply the changes to all selected employees.
Punch Management
The Punch Management section allows administrators to view, edit, and manage employee time punches. This is where you can correct punch times, add missing punches and apply PTO or holiday pay.
Viewing Punch Records
Access punch records through the main navigation bar under Punch Management -> Edit Employee Punches

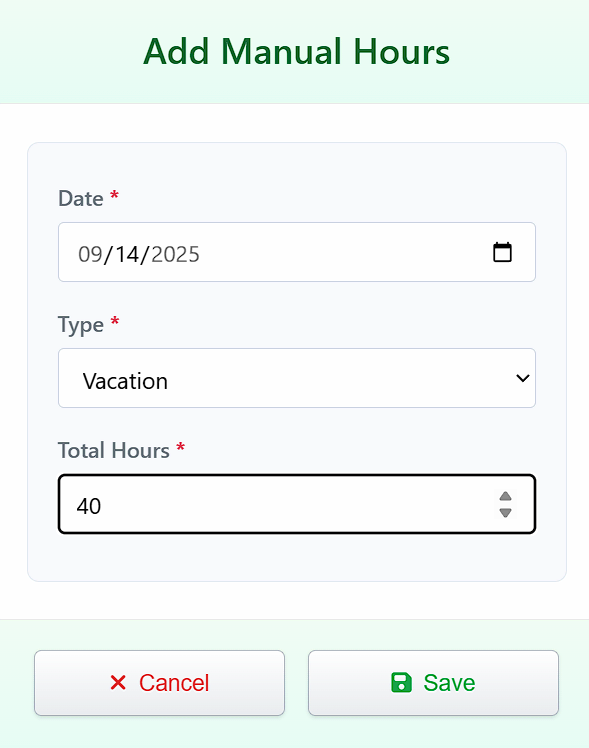
Adding PTO
To add PTO for an INDIVIDUAL employee, navigate to Punch Management -> Edit Employee Punches"Add PTO"
To add PTO globally, navigate to Punch Management -> Add Global Hours (see next section)
- Fill out form
- Date must be in current pay period
- Select type (Vacation, Holiday, etc.)
- Apply number of hours to add
- PTO balances are automatically updated
Adding Missing Punches
If an employee forgot to punch in or out, you can add the missing punch manually., then save.
- Click "Add Timed Punch"
- Date must be in current pay period
- Enter the punch time
- Edited punch times are always defined as "Supervisor Override" for the punch type.
- Total and OT are recalculated automatically
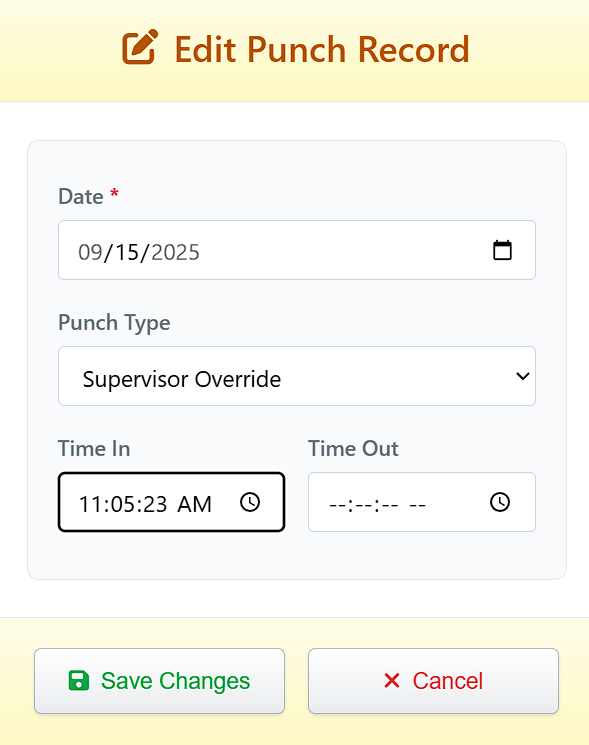
Editing Punch Times
To edit a punch time, select the punch record and click "Edit Punch". You can modify the punch time, add notes, and save the changes. All edits are logged for audit purposes.
- Select a row to edit in the table
- Click "Edit Row"
- Date must be in current pay period
- Edited punch times are always defined as "Supervisor Override" for the punch type.
- Adjust values and click save
Deleting Incorrect Punches
Incorrect punches can be deleted by selecting the punch record and clicking "Delete Row". A confirmation dialog will appear before the punch is permanently removed.
Adding Global PTO
To apply PTO to ALL employees, navigate to Punch Management -> Add Global PTO
- Date must be in current pay period
- Select type (Vacation, Holiday, etc.)
- Apply number of hours to add
- PTO balances are automatically updated
Managing Departments
Departments help you organize employees for reporting and management. Each employee can be assigned to one department.
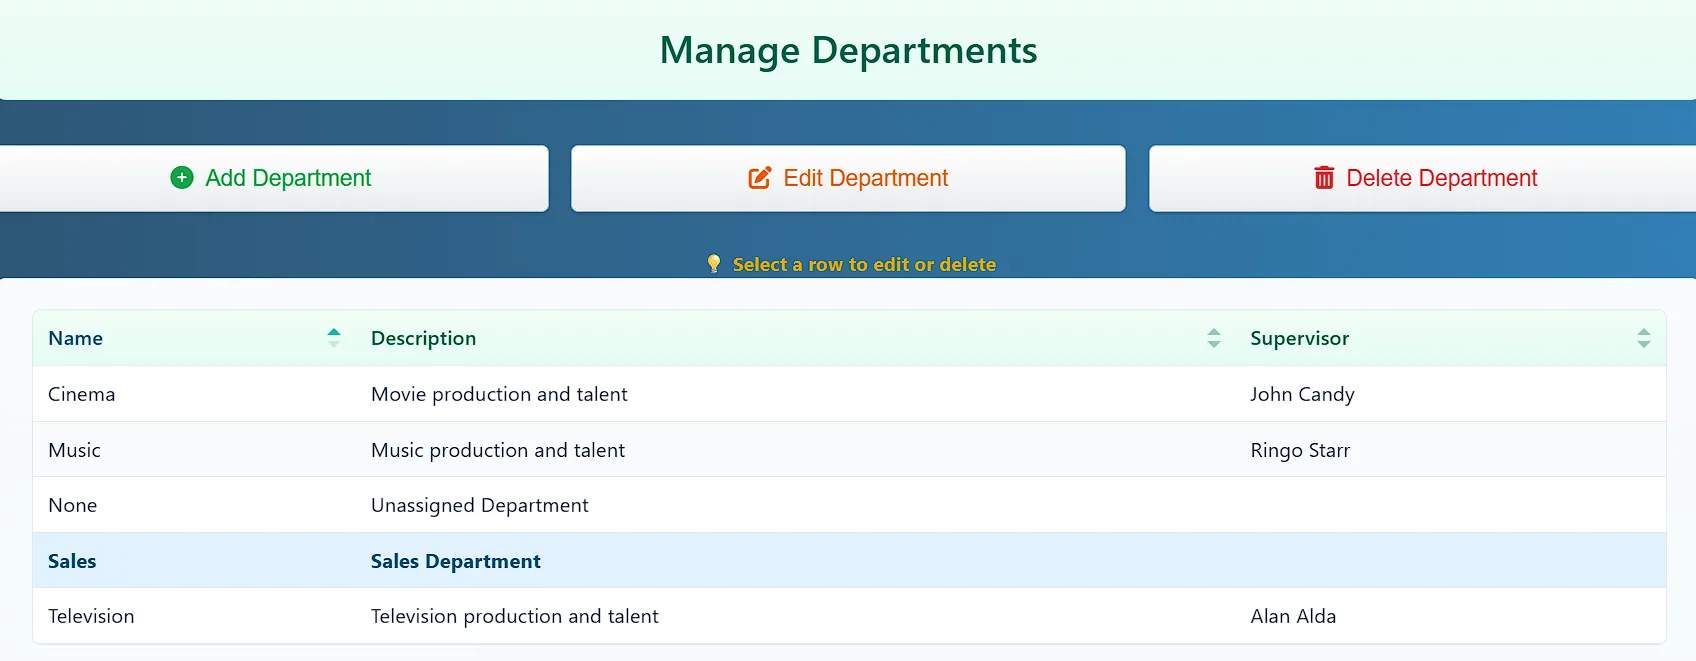
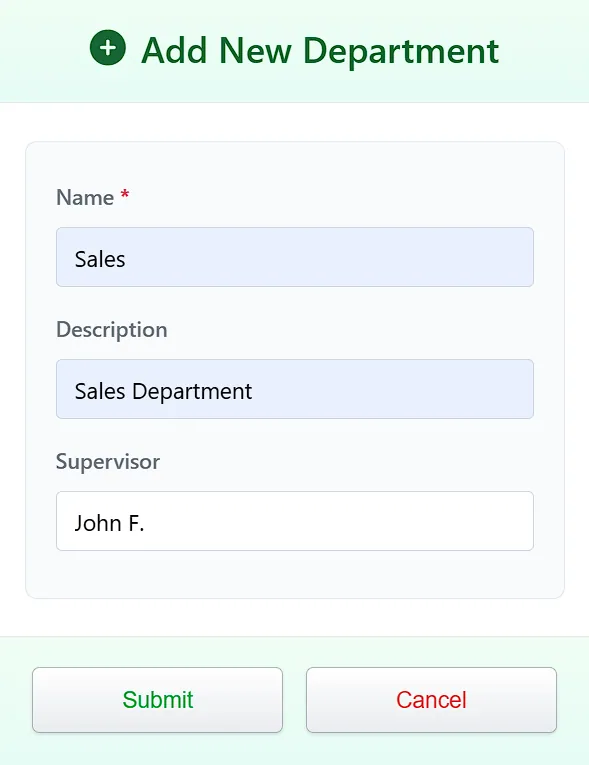
Adding a New Department
Click "Add Department", enter a unique name and optional details, and click "Submit".
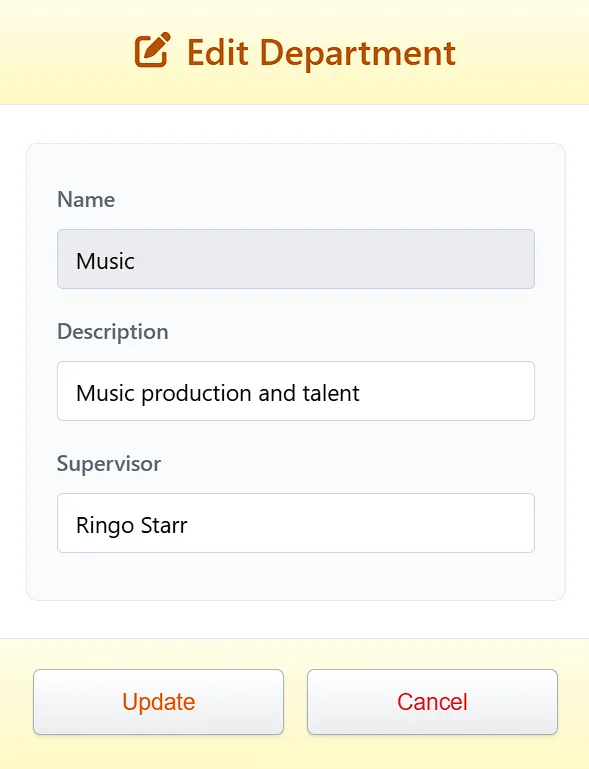
Editing a Department
Select a department, click "Edit Department", make your changes, and click "Save Changes".
Note: Name cannot be changed. Instead, create new department, delete old department while re-assigning employees (if any) to new department.
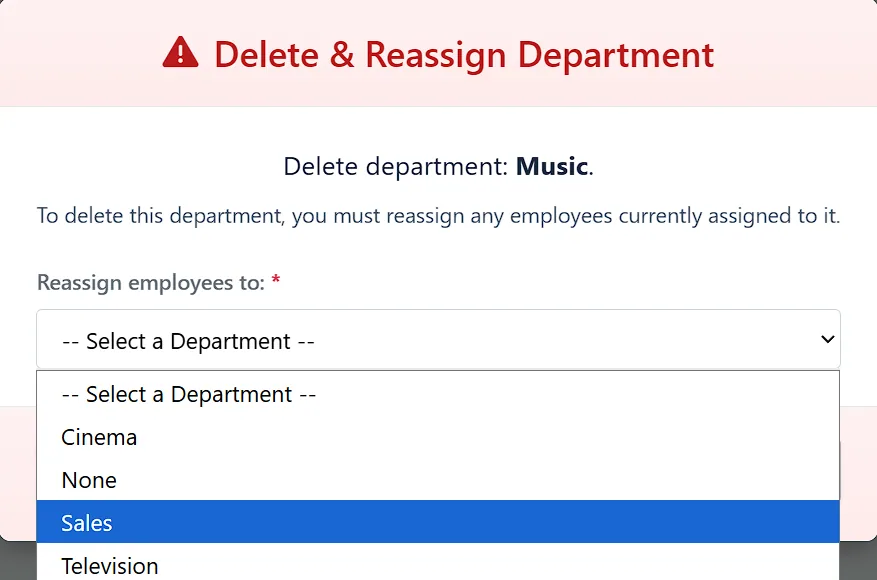
Deleting a Department
Select a department and click "Delete Department". You must re-assign any employees from the deleted department to a new one before confirming the deletion.
Note: Deleting or Re-naming department "None" is not allowed as it is a system default.
Managing Schedules
Schedules define standard shift times and apply automatic lunch deductions and flags attendance exceptions (tardies).
If Auto Lunch is enabled, time will be deducted from the daily total as per the auto lunch threshold and lunch length defined.
Tardy punches will only be observed and recorded if the employee is assigned to a schedule with defined start and end times and days. (only marked tardy on scheduled days).
"Open" schedules do not record tardies.
Tardies will show on time card in RED.
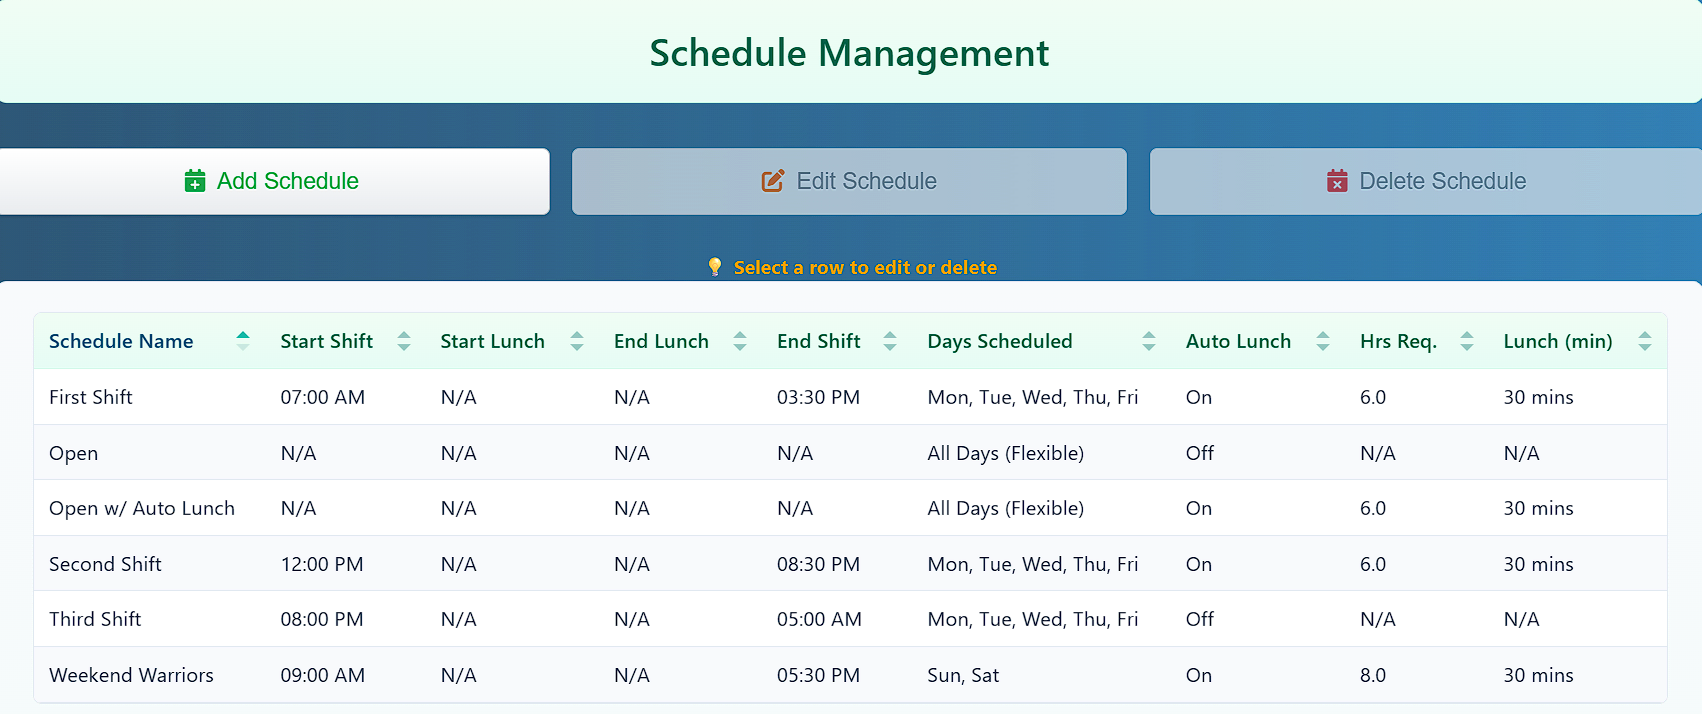
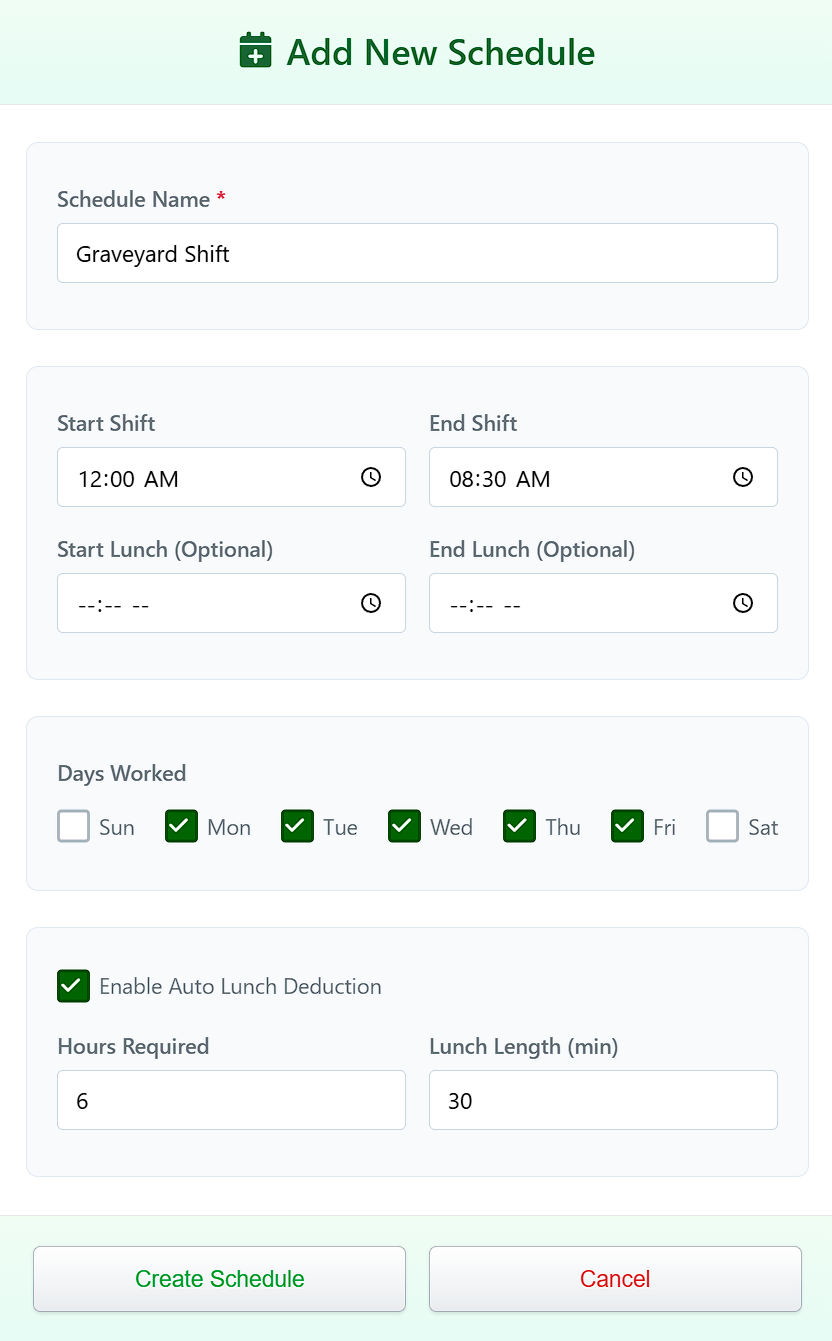
Adding a New Schedule
Click "Add Schedule", enter a unique name, set shift times, and configure auto-lunch rules if needed.
The auto-lunch feature requires you to specify the hours an employee must work (Hrs Req) and the break duration in minutes (Lunch (min)).
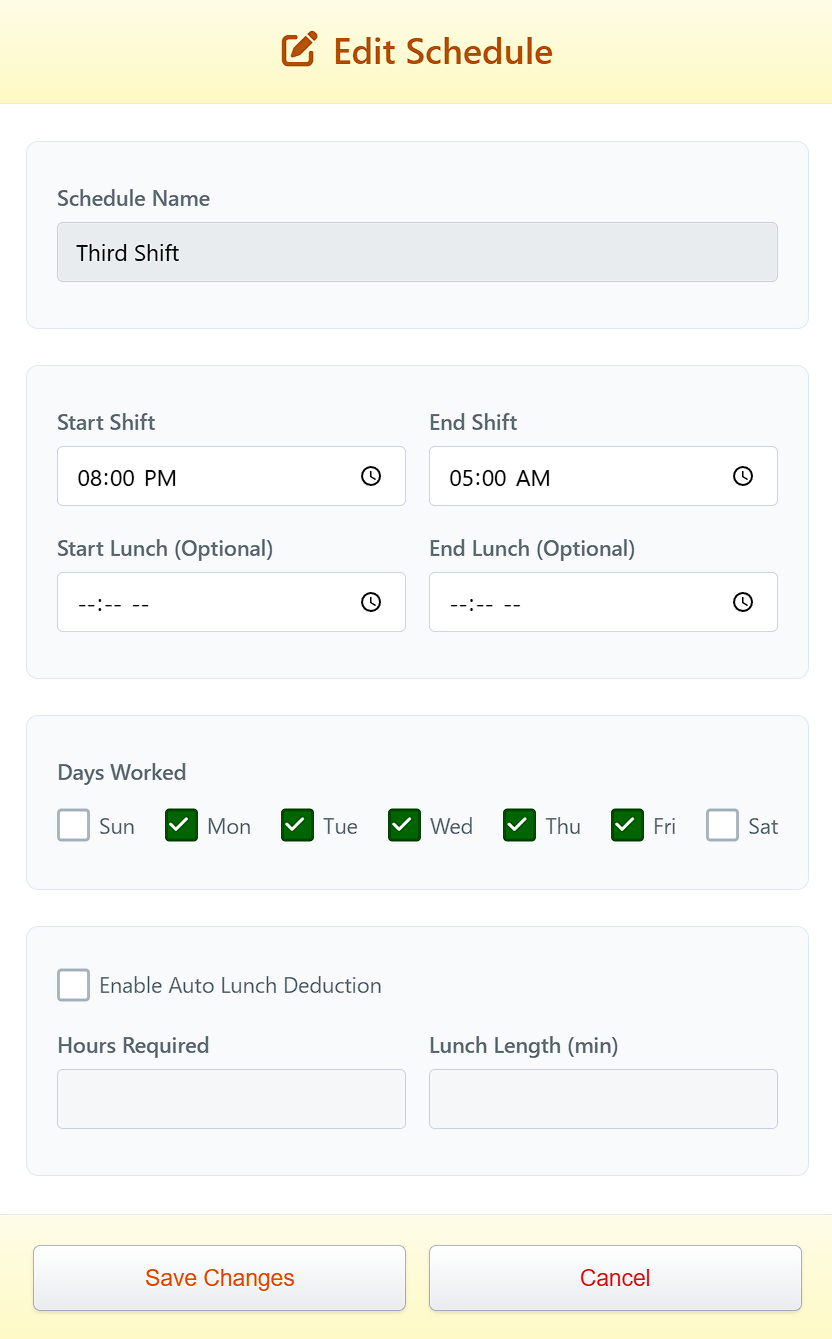
Editing a Schedule
Select a schedule, click "Edit Schedule", and update its details. Note: The schedule name cannot be edited.
To rename a schedule, you must create a new one and reassign employees while deleting the old one.
Note: Editing "Open" or "Open w/ auto lunch" is not allowed as they serve as a system default. "Open w/ auto lunch" is editable (threshold and lunch length only)
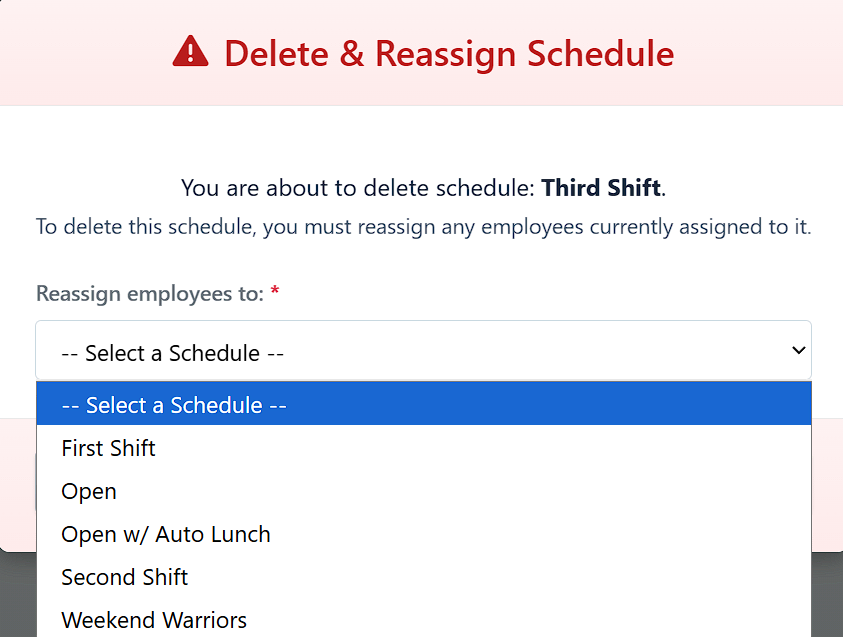
Deleting a Schedule
Select a schedule and click "Delete Schedule". You must select another schedule to move any employees (if any) on that schedule, to a different schedule before confirming the deletion.
Note: Deleting "Open" or "Open w/ auto lunch" is not allowed as is serves as a system default.
Managing PTO Policies
Accrual policies define how employees earn paid time off (PTO). The system automatically adds prorated hours to each employee's PTO balance when each pay period is closed.
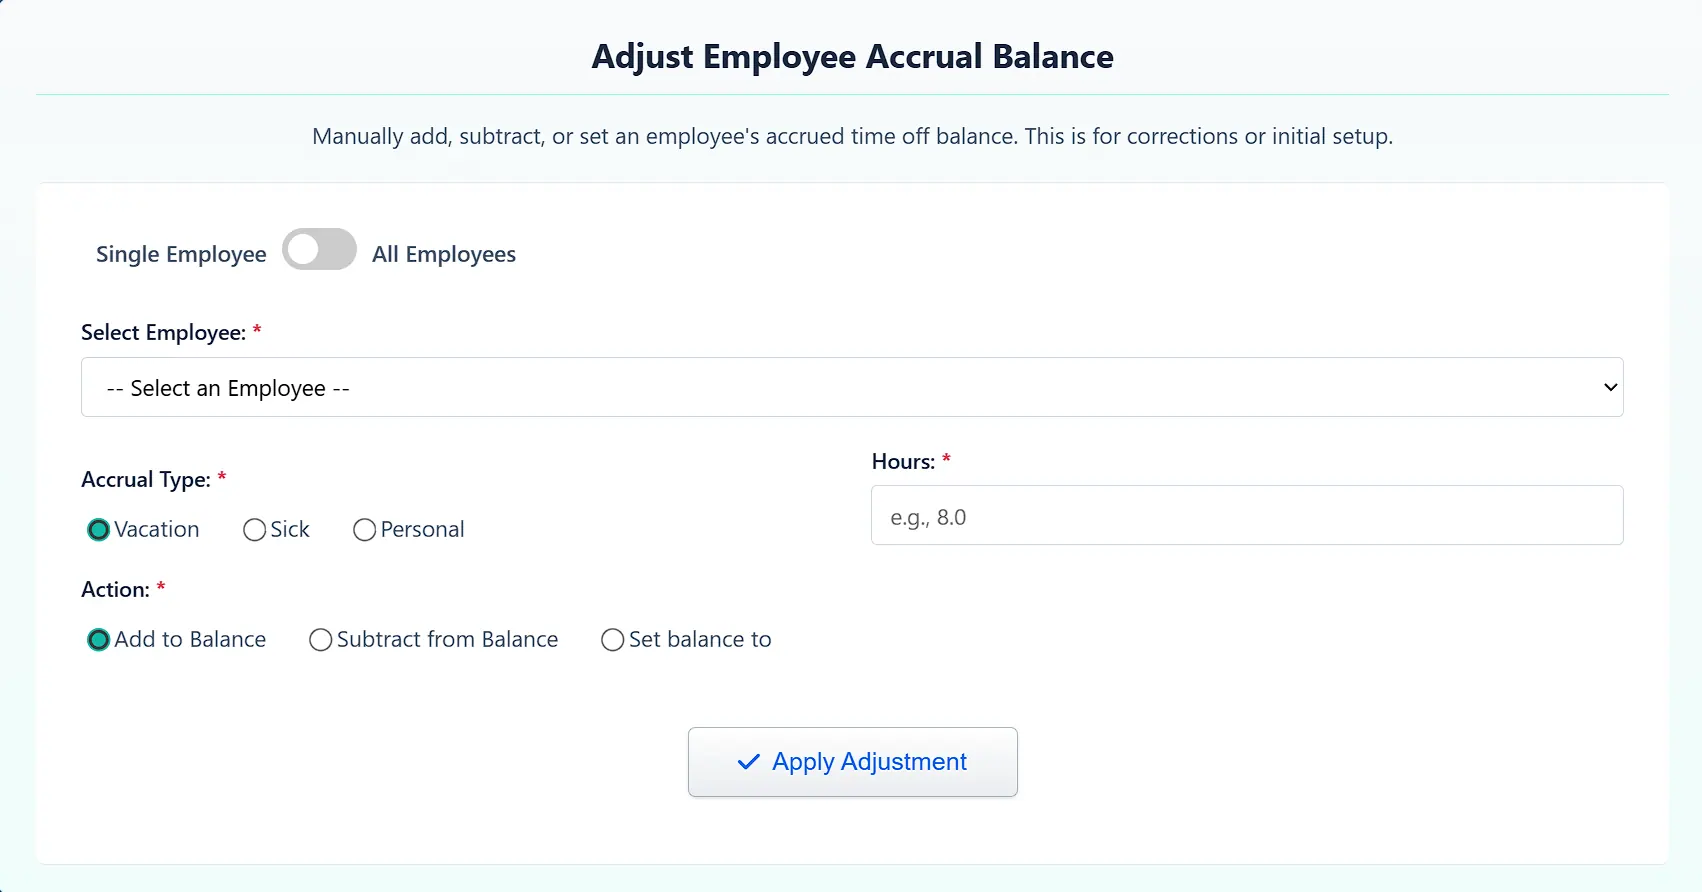
You can also add to, subtract from, or set the PTO balance for individuals or all employees in the Adjust Employee PTO Balance section. (Especially useful during initial setup)
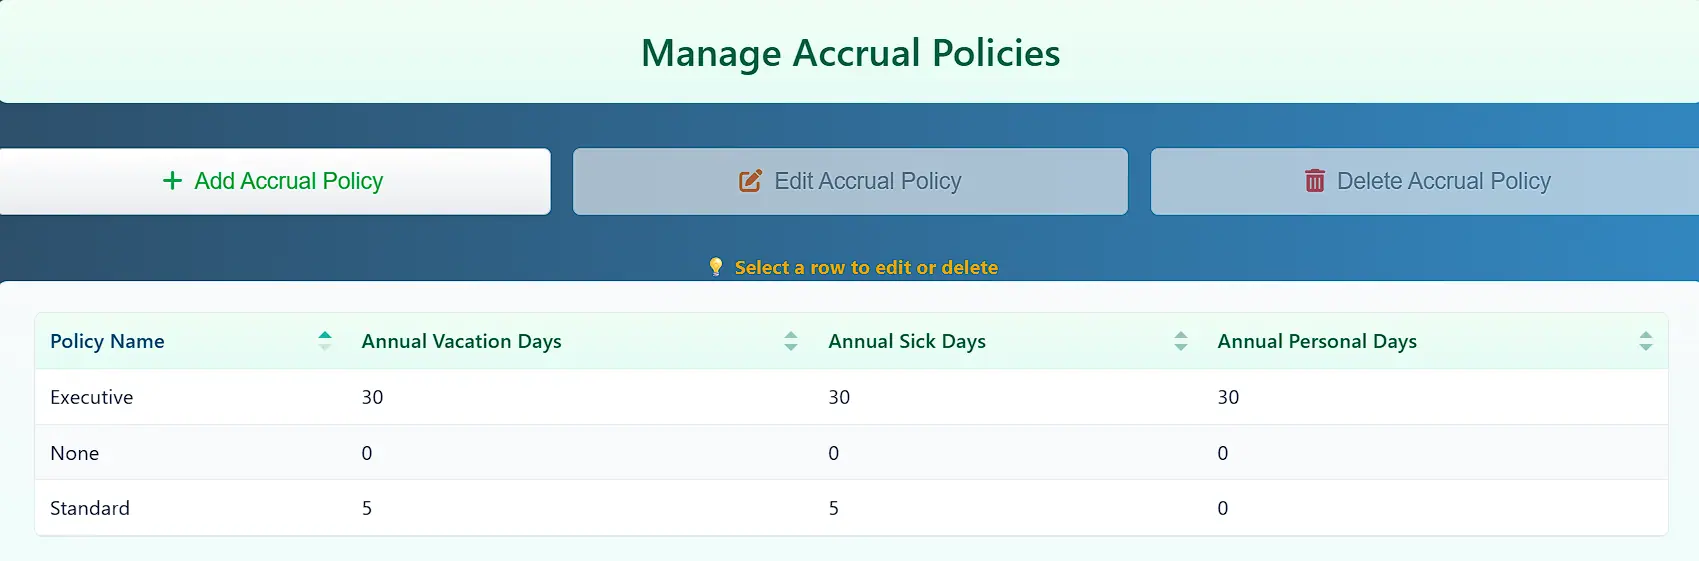
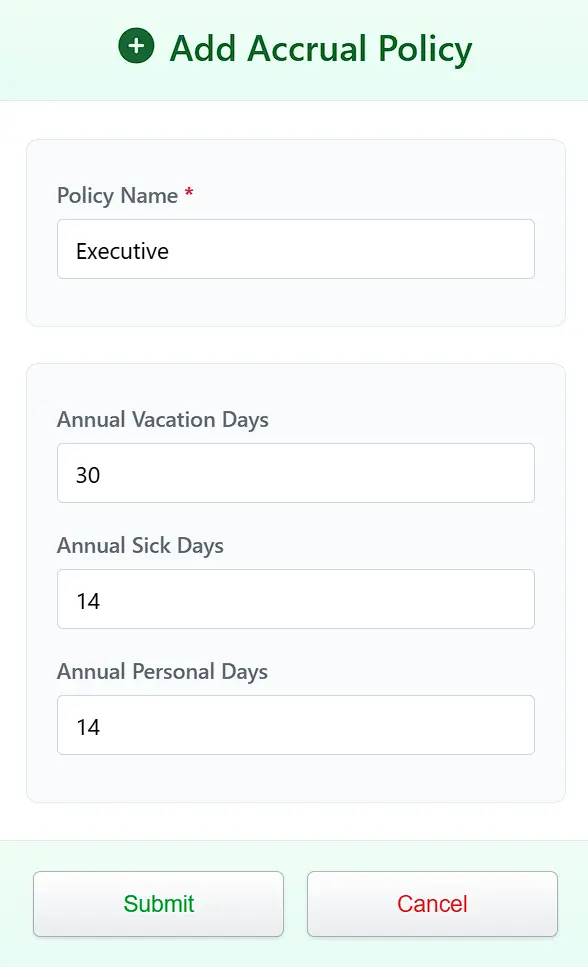
Adding a New PTO Policy
Click "Add Policy", give it a unique name, and enter the annual hours for Vacation, Sick, and Personal time.
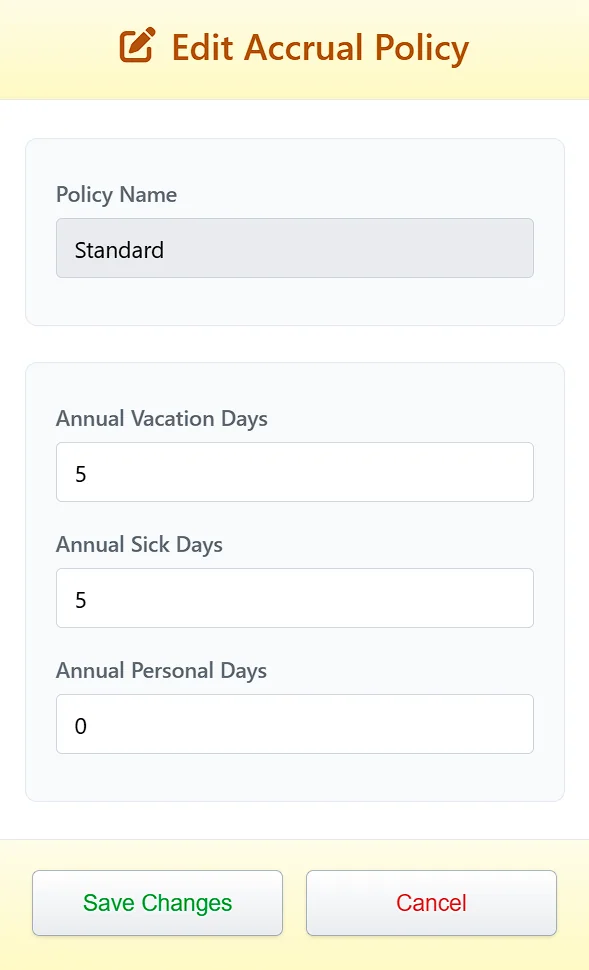
Editing an PTO Policy
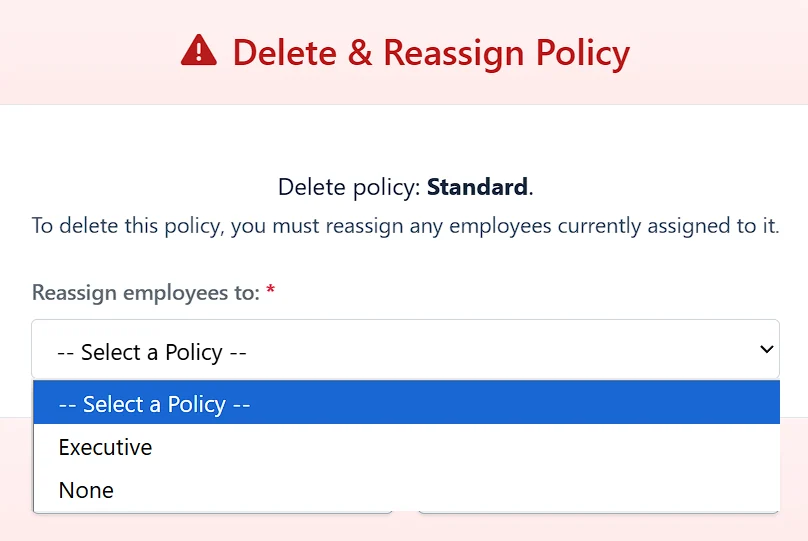
Select a policy, click "Edit Policy", and adjust the time-off hours. Note: The policy name cannot be changed. To rename, you must create a new policy and reassign employees before deleting the old one.
Deleting an PTO Policy
Select a policy and click "Delete Policy". You will be required to re-assign employees to a different policy before confirming the deletion.
Note: Deleting "None" policy is not allowed as is serves as a system default.
Adjusting PTO
- Select an individual or all employees
- Select PTO type
- Select action
- Define hours
- Click Apply Adjustment
Global Settings
The Global Settings page controls the core time keeping rules for your entire company.
Pay Period and Tardy Rules
- Pay Period Type: How often you pay employees (Weekly, Bi-Weekly, etc.).
- First Day of Work Week: Critical for calculating weekly overtime.
- (Sunday is standard in US)
- Only relevant for pay periods over one week.
- Pay Period Start Date: A calendar date that one of your pay periods begins on.
- Pay period End Date is calculated automatically
- Grace Period (Minutes): How many minutes an employee can punch in late (or leave early) before being marked as "Tardy". Tardies are recorded for reporting purposes and displayed in red on time card.

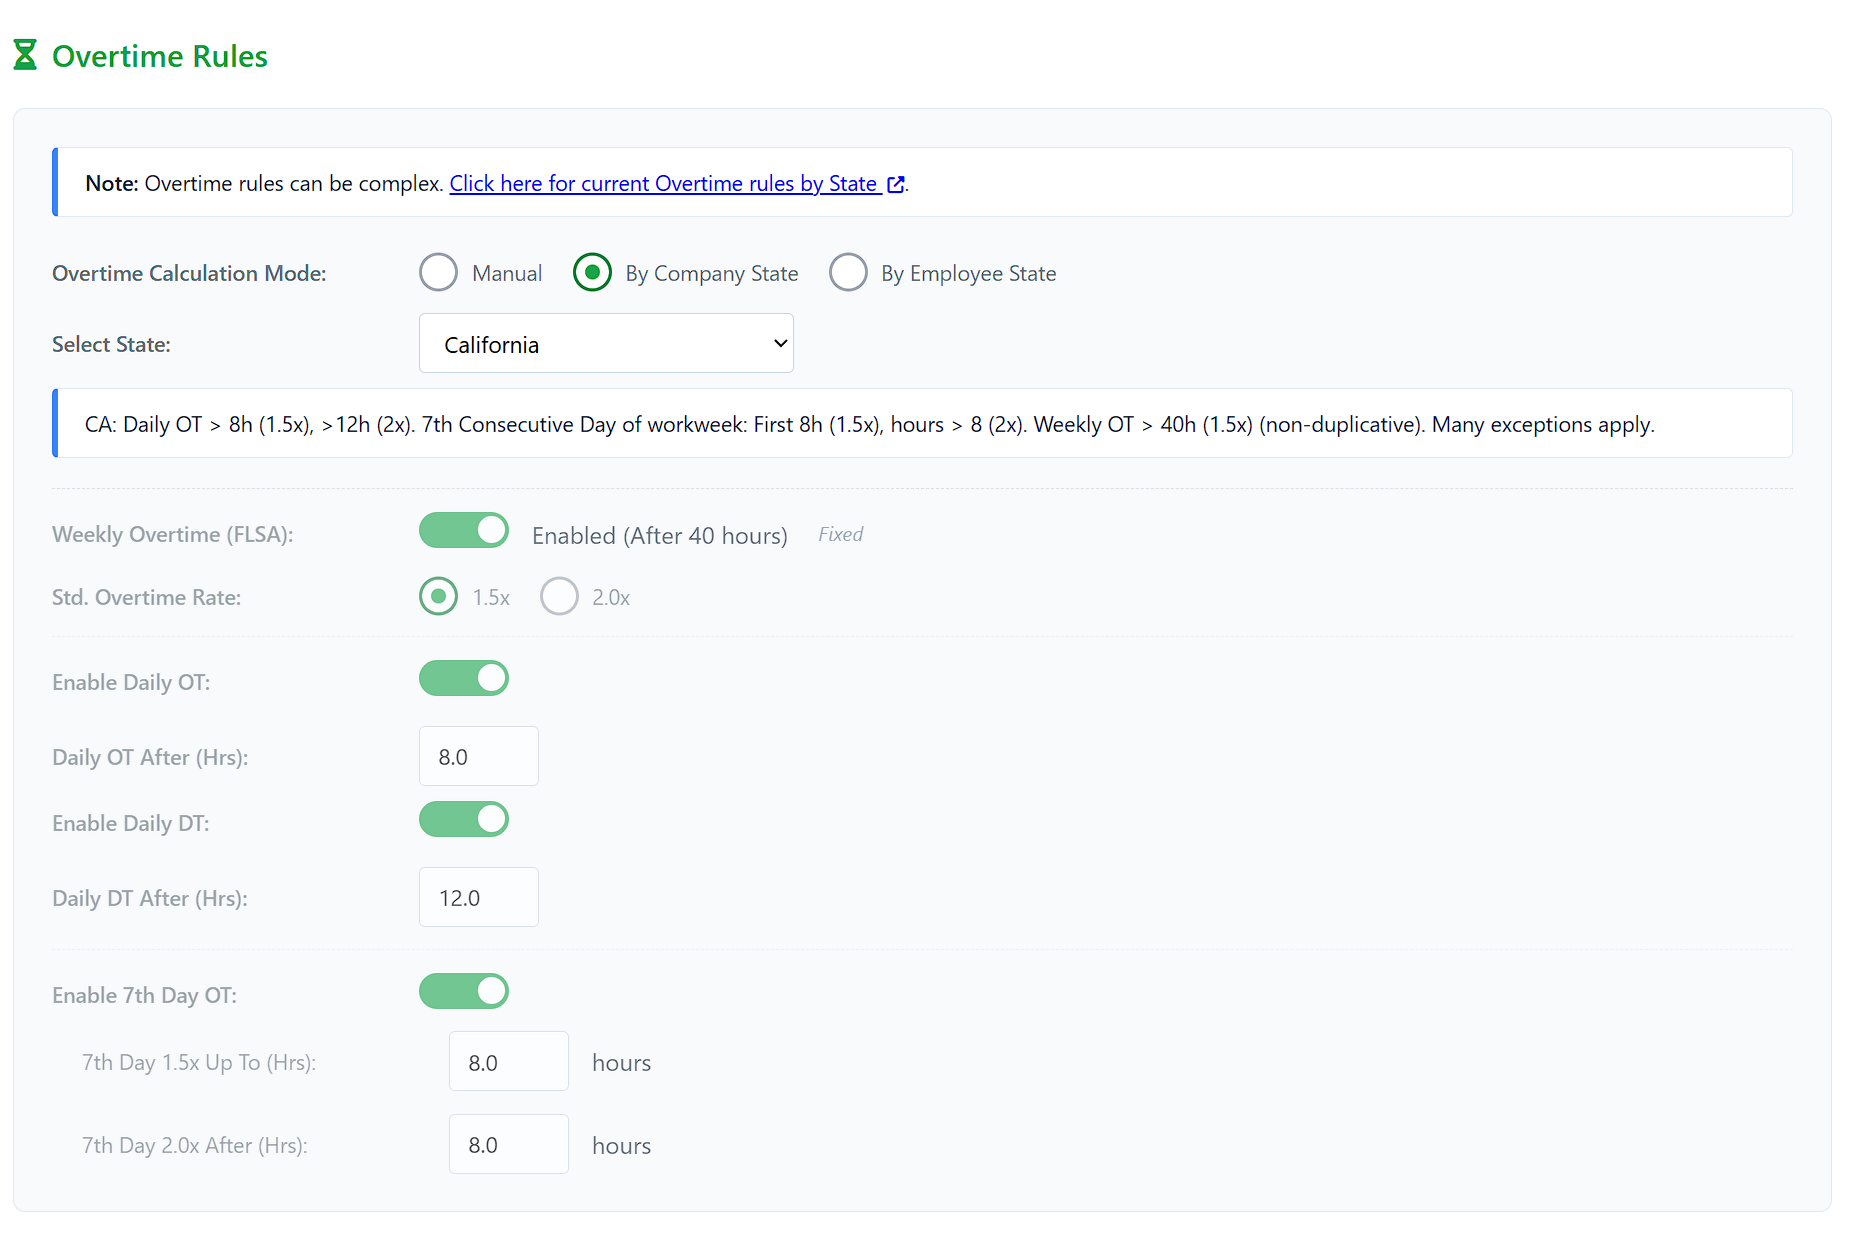
Overtime Rules
Configure how overtime is calculated for daily, weekly, and 7th-day overtime (OT) and double-time (DT) rules.
- Either with manual rules
- Automatically by state (recommended to ensure compliance)
- Pro Plan subscribers have option for remote workers or locations, which calculates each employee's overtime according to the state in each employee's profile.
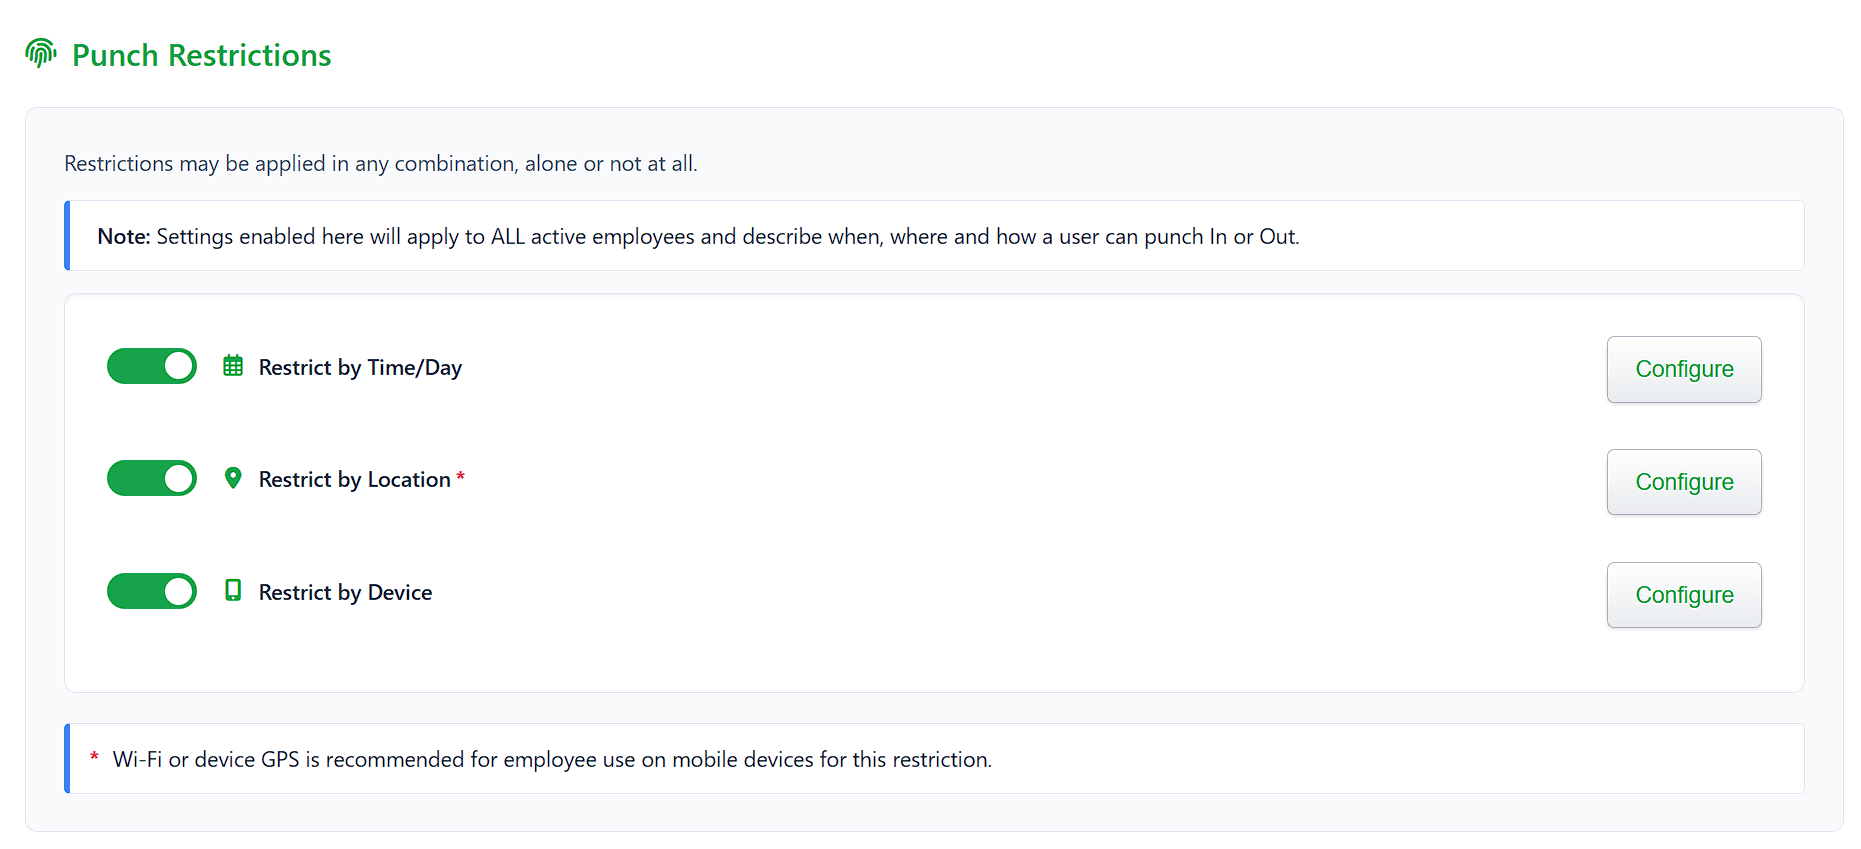
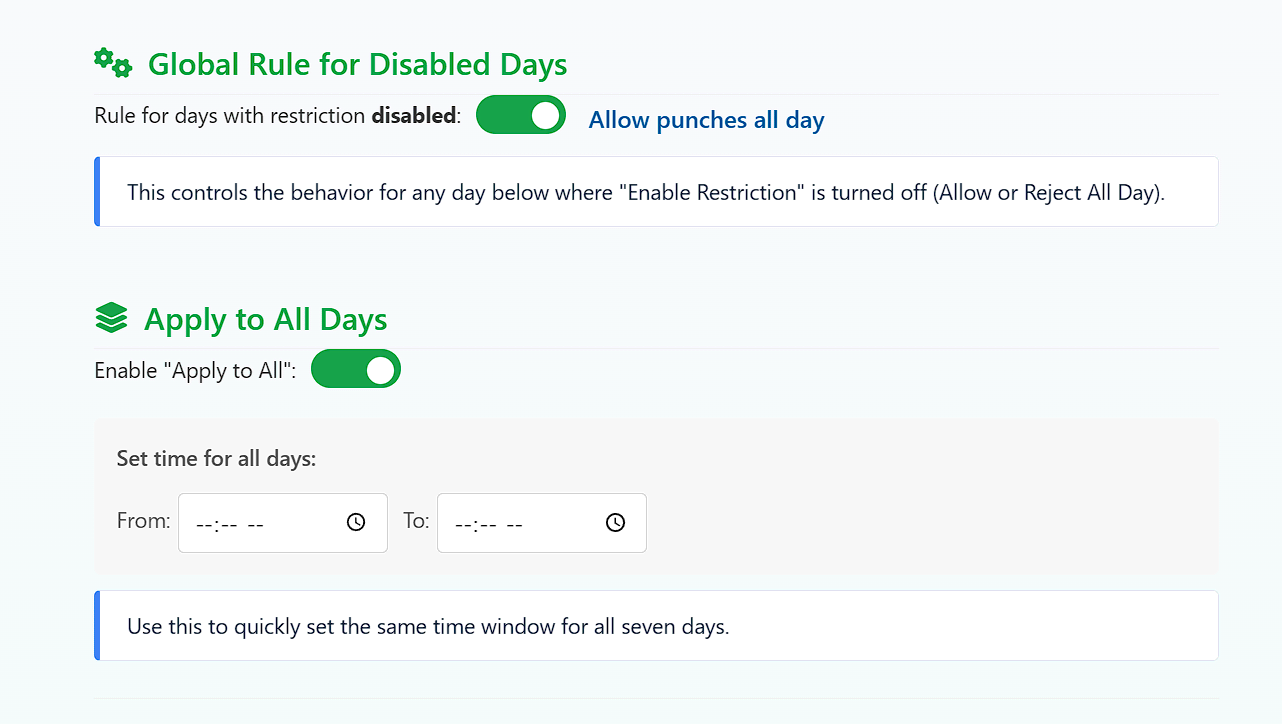
Punch Restrictions
Control when, where and how employees can punch the clock. Any combination of restrictions (if any) is allowed.
- Restrict by Time/Day: Set specific time windows for each day of the week.
- Restrict by Location: Set up geofences so employees can only punch in/out from specific locations.
- Restrict by Device: Ensure employees can only punch from registered devices.
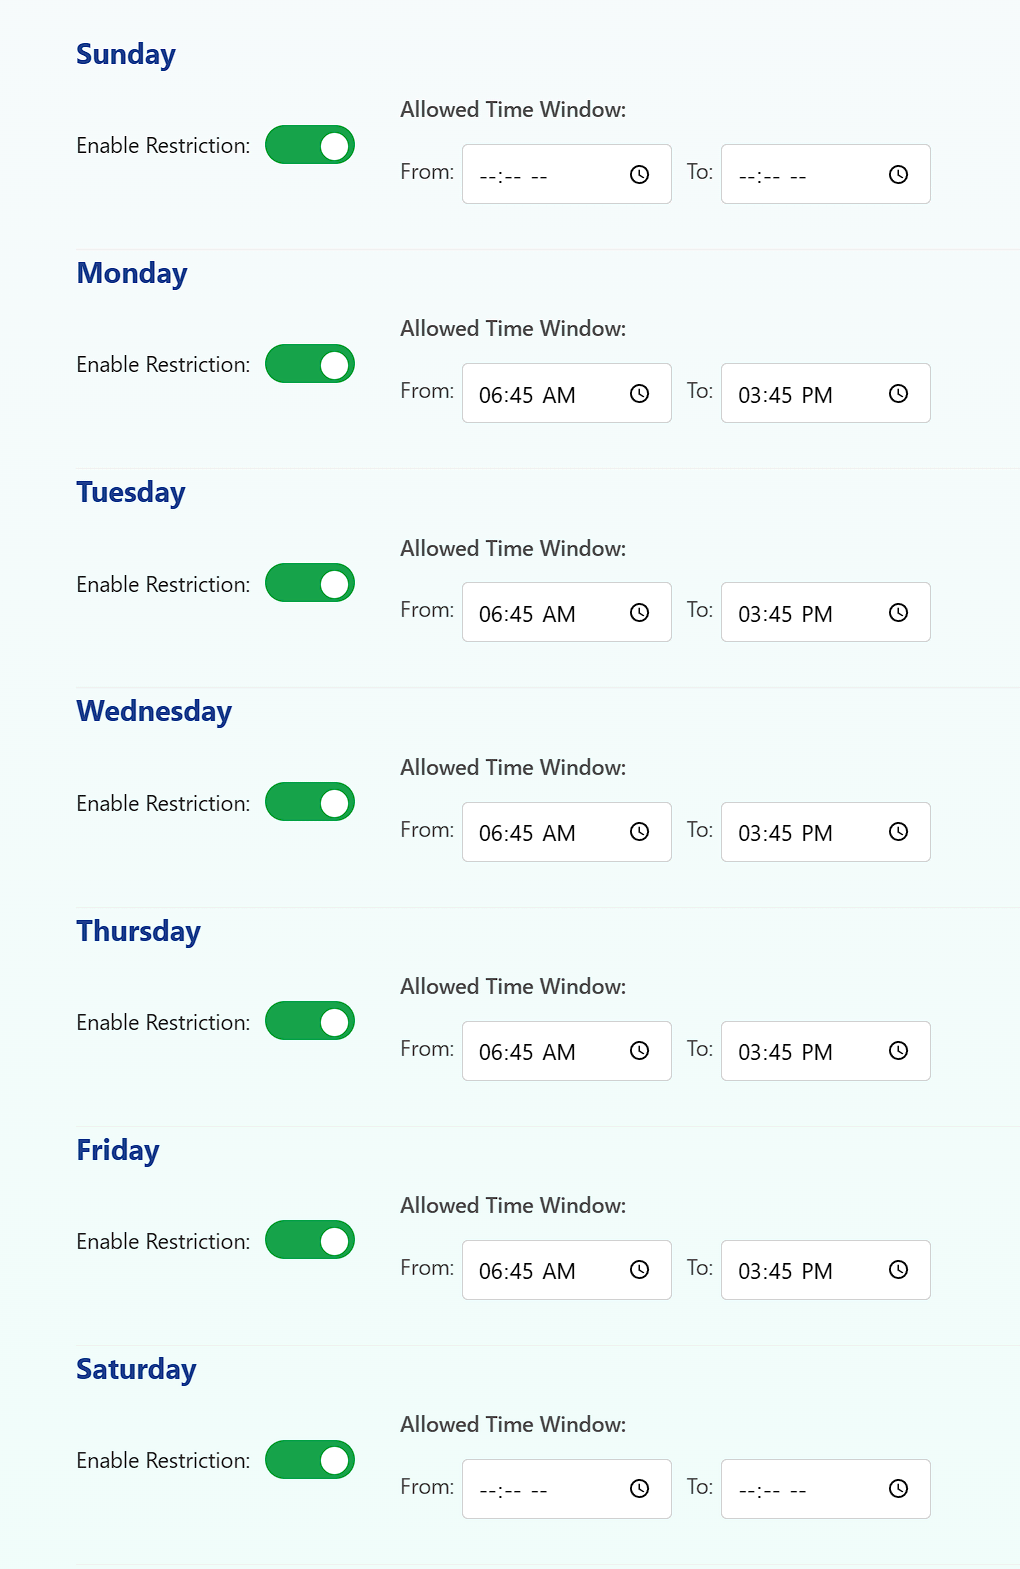
Configuring Time/Day Restrictions
For each day of the week, you can specify allowed punch-in and punch-out time ranges.
- If no times are set for a day, you can choose whether to restrict all day or allow all day.
- Quickly set all days to the same time windows using the Apply to All Days toggle.
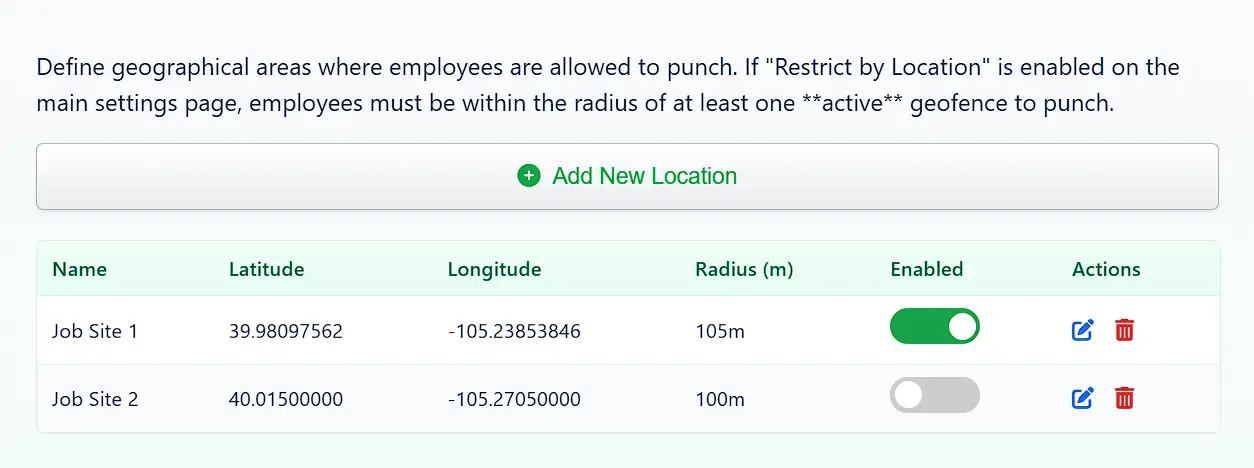
Configuring Location Restrictions
To restrict punches by location, first enable the feature. Then, add locations by specifying a name, address, and radius in meters.
- Employees must be within this radius to punch in/out.
- Location restrictions are only recommended if employees are using GPS enabled devices.
- Punch radius may have to be adjusted if only using wi-fi.
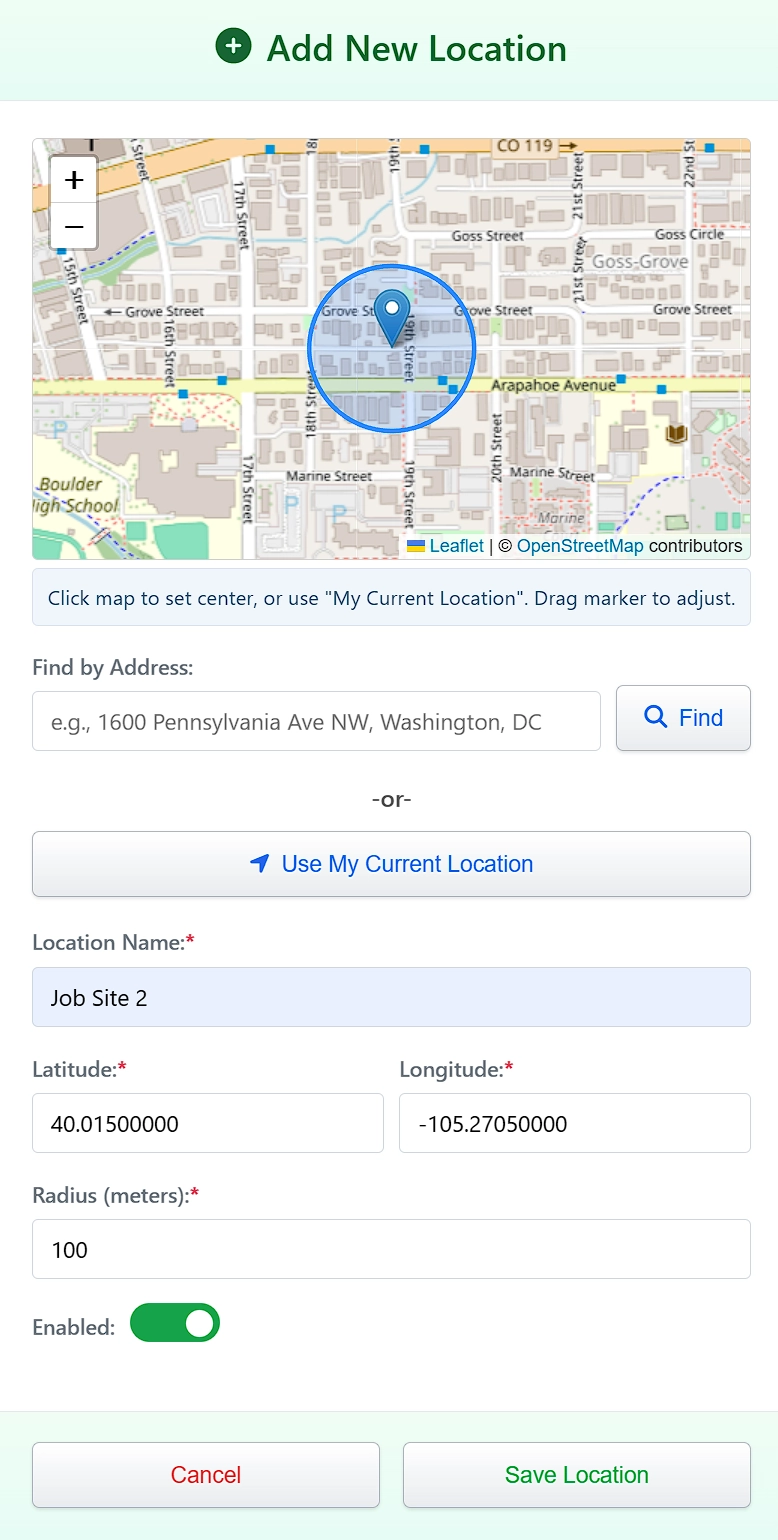
Adding/Editing a Location
Click "Add Location", enter a unique name, address, and radius in feet, then click "Submit". You can also use the "Use My Location" button to auto-fill your current location coordinates.
Click Save.
Make sure individual locations are enabled here and with the main toggle in the settings page.
Configuring Device Restrictions
To restrict punches by device, first enable the feature. Then, set the maximum allowed registered devices per employee. When an employee punches IN or OUT, the device's "fingerprint" is checked against the employee's registered devices list.
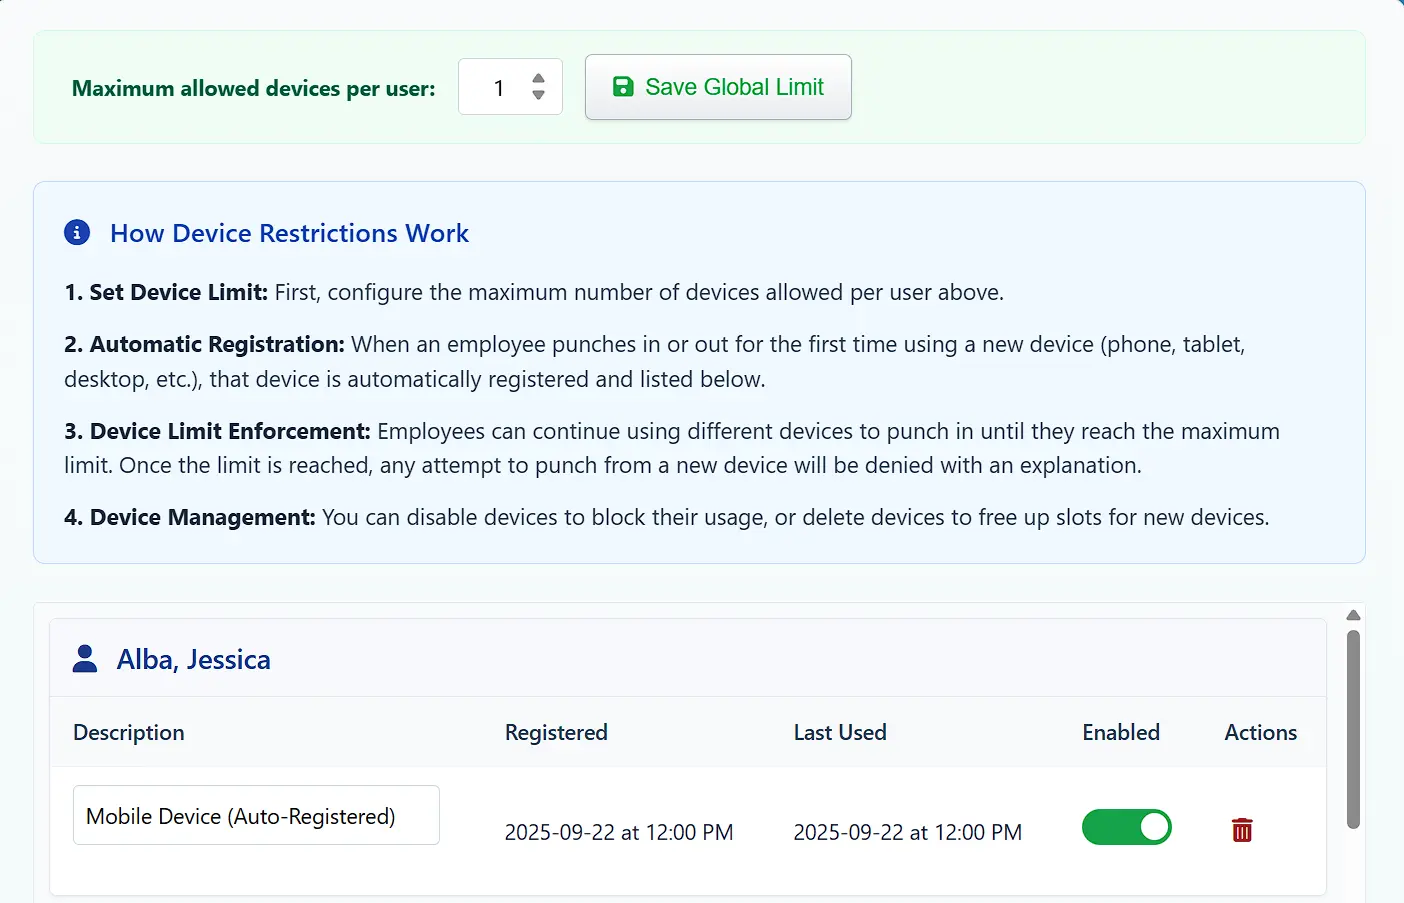
- If the device id registered, then the punch is allowed, otherwise it will attempt to register the device.
- If the maximum registered devices has been reached, the punch is denied until an administrator allows more devices per user, or a previous device is deleted.
- Devices can be blocked from punching with the disable toggle
- VPNs, private browsing (incognito mode), proxy servers, etc. will cause the system to detect a new device.
- Administrators can view and manage all registered devices from the Settings > Restrict by device > Configure page.
Payroll Processing
The Payroll Processing page is where you review and finalize employee time cards for payroll.
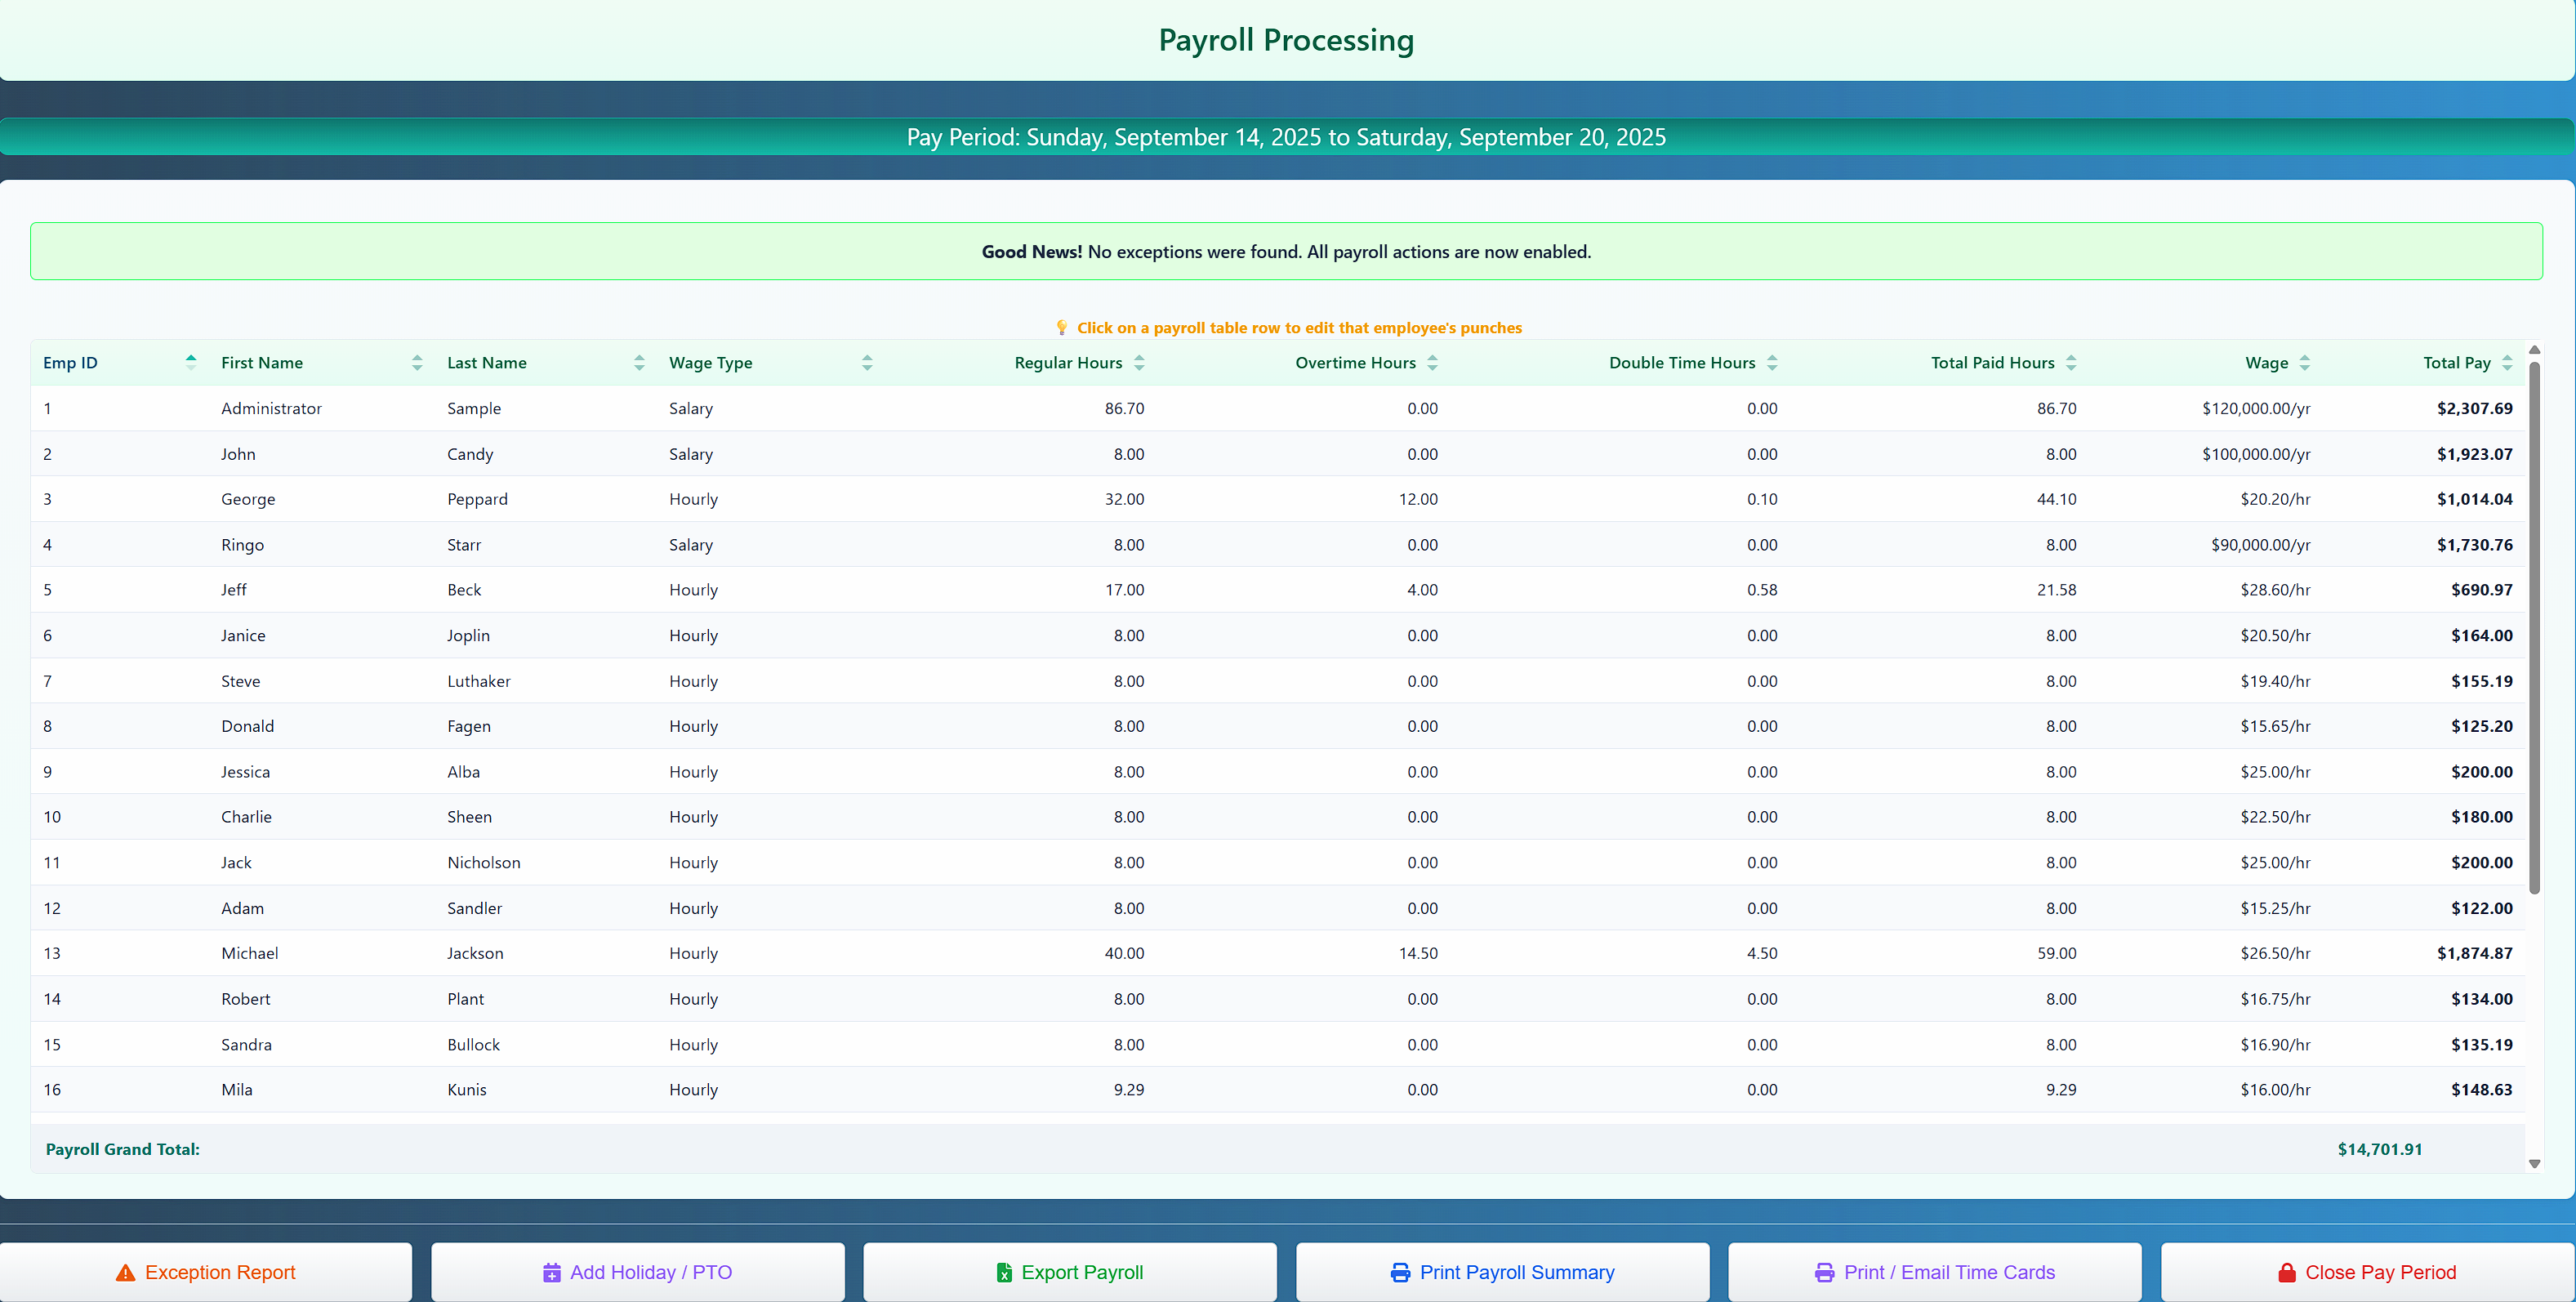
Reviewing Time Cards
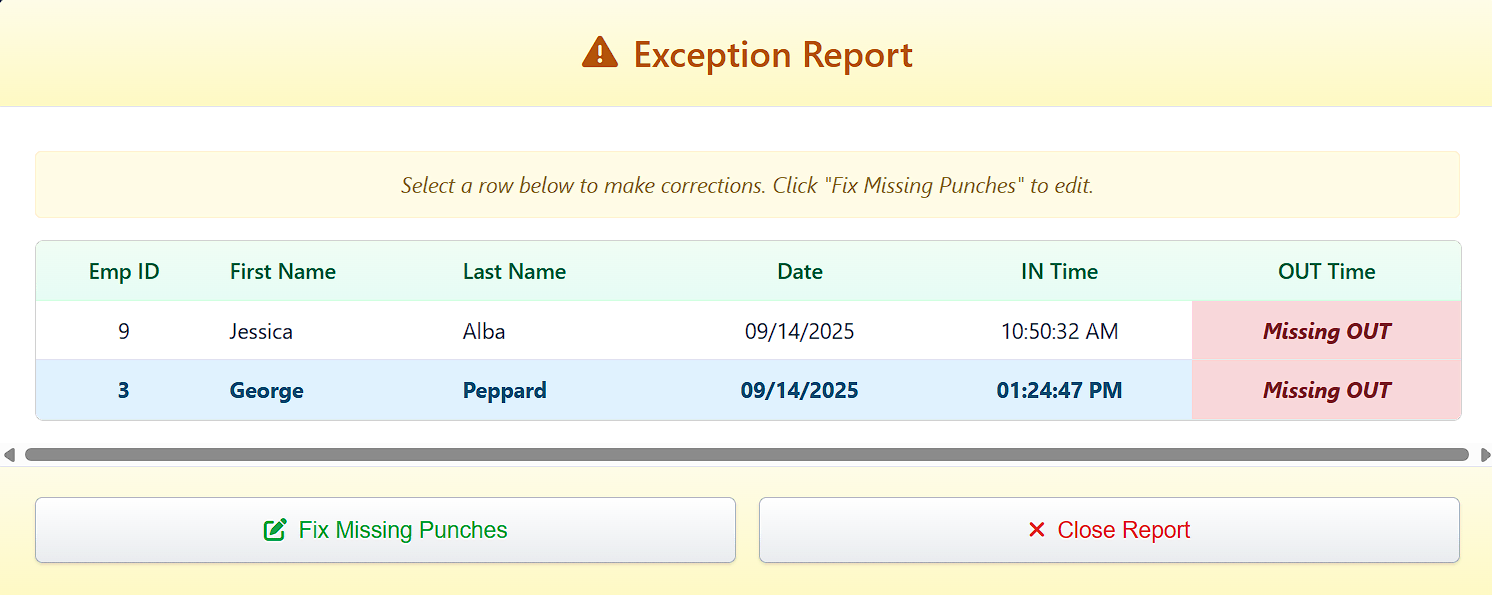
- Step 1 is to run the Exception Report. This will reveal any missing punches for the current pay period and display them in a table. >
- To edit, click on a row and click Fix Missing Punches.
- Manually enter the missing punch time and click Save Changes.
- Employee's total hours will be adjusted and the entry will be removed from the exception list.
- Continue fixing punches until list is empty. Other Payroll options will not be available until ALL Exceptions are resolved
- After handling exceptions you can optionally perform other tasks like adding Vacation/Holiday hours, adding Tips, Exporting to an Excel file and Printing / Emailing time cards.
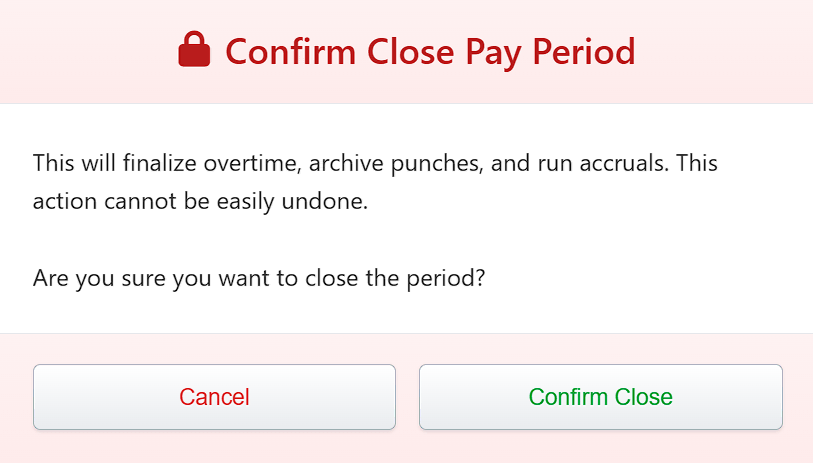
- After reviewing, click "Close Pay Period" to end the pay period. Finalized periods cannot be edited.
- Upon closing, new pay period date range will be applied, current punches will be archived, tip totals will be recorded in payroll history, and accrued balances will be updated (Vac., Sick, etc.).
How Overtime is Calculated
Overtime Calculation Methods
Your overtime calculation depends on your subscription plan and configuration settings:
Basic and Business Plans: Overtime can be calculated using two methods:
- By Company State: All employees follow the overtime rules of your company's registered state, regardless of where individual employees are located.
- Manual Override: You can set custom overtime rules that override both federal and state calculations.
Pro Plan: Includes all the above options plus:
- By Employee State: Each employee's overtime is calculated according to the labor laws of the state listed in their employee profile. This ensures compliance with state-specific overtime rules, which can vary significantly. This feature is particularly useful for companies with remote workers or multiple office locations across different states.
Work Week Definition
The system calculates overtime based on a 7-day work week period. By default, the work week starts on Sunday at 12:00 AM and ends on Saturday at 11:59 PM. This means:
- Hours are counted from Sunday through Saturday for overtime purposes
- Overtime calculations reset each Sunday
- Daily overtime rules (where applicable by state) are calculated within each 24-hour period
Note: While it's optional, changing the first day of the work week in Settings is not recommended as it may affect overtime calculations and payroll consistency.
State-Specific Rules
Different states have varying overtime requirements:
- Some states require overtime after 8 hours in a single day (daily overtime)
- Others follow the federal standard of 40 hours per week
- Certain states have different rates for double-time (2x pay) after specific thresholds
- For complete state-by-state overtime rules, visit the Department of Labor's State Minimum Wage and Overtime Laws
Calculation Priority
When multiple overtime rules apply, the system uses whichever calculation results in the highest pay for the employee, ensuring compliance while maximizing employee compensation.
Punch types other than "User Initiated" or "Supervisor Override" (PTO), and Salaried employees are not included in Overtime calculations.
Tip Management
The Tip Management system allows you to track and manage employee tips with seamless integration into payroll processing. Tips can be added for individual employees or entire shifts and are automatically included in payroll calculations.
Accessing Tip Management
Tip management is accessed through the Payroll Processing page. Click the "Add Tips" button in the payroll actions section.
Adding Tips for Individual Employees
- Navigate to Payroll Processing and click "Add Tips"
- Select "Individual Employee" as the entry type
- Choose the employee from the dropdown list
- Enter the tip amount
- Select the entry date (must be within current pay period)
- Click "Add Tips" to save
Adding Tips by Schedule/Shift
For businesses that pool tips or distribute them equally among shift workers:
- Select "By Schedule" as the entry type
- Choose the schedule from the dropdown (e.g., "Morning Shift", "Evening Shift")
- Select which employees from that schedule should receive tips
- Use "Select All" or "Deselect All" buttons for convenience
- Enter the tip amount per employee
- Select the entry date
- Click "Add Tips" to distribute to all selected employees
Tip Integration with Payroll
Tips are automatically integrated into the payroll system:
- Payroll Display: Tips appear in a dedicated "Tips" column on the payroll table
- Total Calculation: Tips are included in the "Total Pay" calculation
- Pay Period Tracking: Tips are tracked by pay period for accurate reporting
- Export Integration: Tips are included in payroll exports for external processing
Tip Reporting and History
Tips are tracked and reported through several mechanisms:
- Current Payroll: View current period tips in the main payroll table
- Payroll History: Historical tip totals are stored with each closed pay period
- Export Reports: Tips can be included in payroll export files
- Employee Tracking: Individual employee tip history is maintained
Important Notes
Pay Period Restrictions: Tips can only be added for dates within the current pay period. Once a pay period is closed, tip entries for that period cannot be modified.
Schedule-Based Tips: When adding tips by schedule, only active employees assigned to that schedule will be available for selection.
Tip Amounts: All tip amounts must be positive values. The system supports decimal amounts (e.g., $15.50).
Holiday Overtime Management
The Holiday Overtime system allows you to configure premium pay rates for employees who work on designated holidays. This feature is particularly useful for restaurants, retail, and hospitality businesses that operate during holidays.
Configuring Holiday Overtime
Holiday overtime is configured in the Global Settings under the Overtime Rules section:
- Navigate to Settings > Overtime Rules
- Enable "Holiday Overtime" option
- Set the holiday overtime rate (typically 1.5x or 2x regular pay)
- Configure your holiday calendar
Holiday Calendar Setup
The system supports both federal holidays and custom company holidays:
- Federal Holidays: Automatically includes standard US federal holidays
- Custom Holidays: Add company-specific holidays, religious observances, or local holidays
- Floating Holidays: Configure holidays that move based on business needs
How Holiday Overtime Works
When an employee works on a designated holiday:
- The system automatically detects the holiday date
- Applies the configured holiday overtime rate to all hours worked
- Holiday hours are highlighted in green on time cards
- Holiday overtime is calculated separately from regular overtime
- Takes priority over regular overtime calculations
Holiday Overtime Priority
The system uses a priority system to ensure accurate calculations:
- Highest Priority: Holiday Overtime
- Second Priority: Days Off Overtime
- Third Priority: Regular Overtime
- Lowest Priority: Double Time
Restaurant and Hospitality Benefits
Holiday overtime is especially valuable for service industries:
- Staff Incentives: Encourage employees to work busy holiday shifts
- Fair Compensation: Ensure proper pay for holiday work
- Compliance: Meet labor law requirements for holiday pay
- Tip Integration: Holiday overtime works seamlessly with tip management
Important: Holiday overtime rates and eligibility may vary by state and local labor laws. Consult with your HR department or legal counsel to ensure compliance.
Days Off Overtime Management
Days Off Overtime provides premium pay when employees work on their scheduled days off. This feature helps businesses manage unexpected staffing needs while fairly compensating employees for working outside their normal schedule.
Configuring Days Off Overtime
Days off overtime is configured in the Global Settings:
- Navigate to Settings > Overtime Rules
- Enable "Days Off Overtime" option
- Set the days off overtime rate (commonly 1.5x regular pay)
- Configure eligibility requirements
How Days Off Overtime Works
The system automatically detects when an employee works on a scheduled day off:
- Compares punch dates against employee's assigned schedule
- Identifies days not included in their regular work schedule
- Applies the configured days off overtime rate
- Integrates with existing overtime calculations using priority system
Schedule Integration
Days off overtime works with your existing schedule system:
- Schedule-Based Detection: Uses employee's assigned schedule to determine regular work days
- Flexible Schedules: Works with rotating schedules and shift patterns
- Department Specific: Different departments can have different days off overtime rules
- Individual Overrides: Manually override days off overtime for specific situations
Restaurant Industry Applications
Days off overtime is particularly useful for restaurants and hospitality:
- Emergency Coverage: Compensate staff who cover for sick colleagues
- Busy Periods: Incentivize extra shifts during peak seasons
- Special Events: Fair pay for working during special events or catering
- Cross-Training: Encourage employees to work in different departments
Calculation Examples
Here's how days off overtime integrates with other overtime types:
Example 1: Server Working Extra Shift
- Regular Schedule: Monday-Friday
- Works Saturday (scheduled day off): 8 hours at Days Off OT rate
- Tips: Integrated normally with days off overtime pay
Example 2: Holiday + Days Off Combination
- Employee works on Christmas (holiday) which is also their scheduled day off
- Holiday overtime takes priority over days off overtime
- All hours paid at holiday overtime rate
Reporting and Tracking
Days off overtime is tracked and reported comprehensively:
- Payroll Integration: Appears as separate column in payroll reports
- Time Card Display: Clearly marked on individual time cards
- Export Compatibility: Included in all payroll export formats
- Historical Tracking: Maintained in payroll history for compliance
Note: Days off overtime calculations respect the priority system: Holiday OT > Days Off OT > Regular OT > Double Time. This ensures employees always receive the highest applicable rate.
Reports
The Reports section provides detailed insights into your employee time data. You can view individual time cards, get payroll summaries, find attendance exceptions, and manage your employee roster. Most reports can be printed or exported.
Time Card Reports
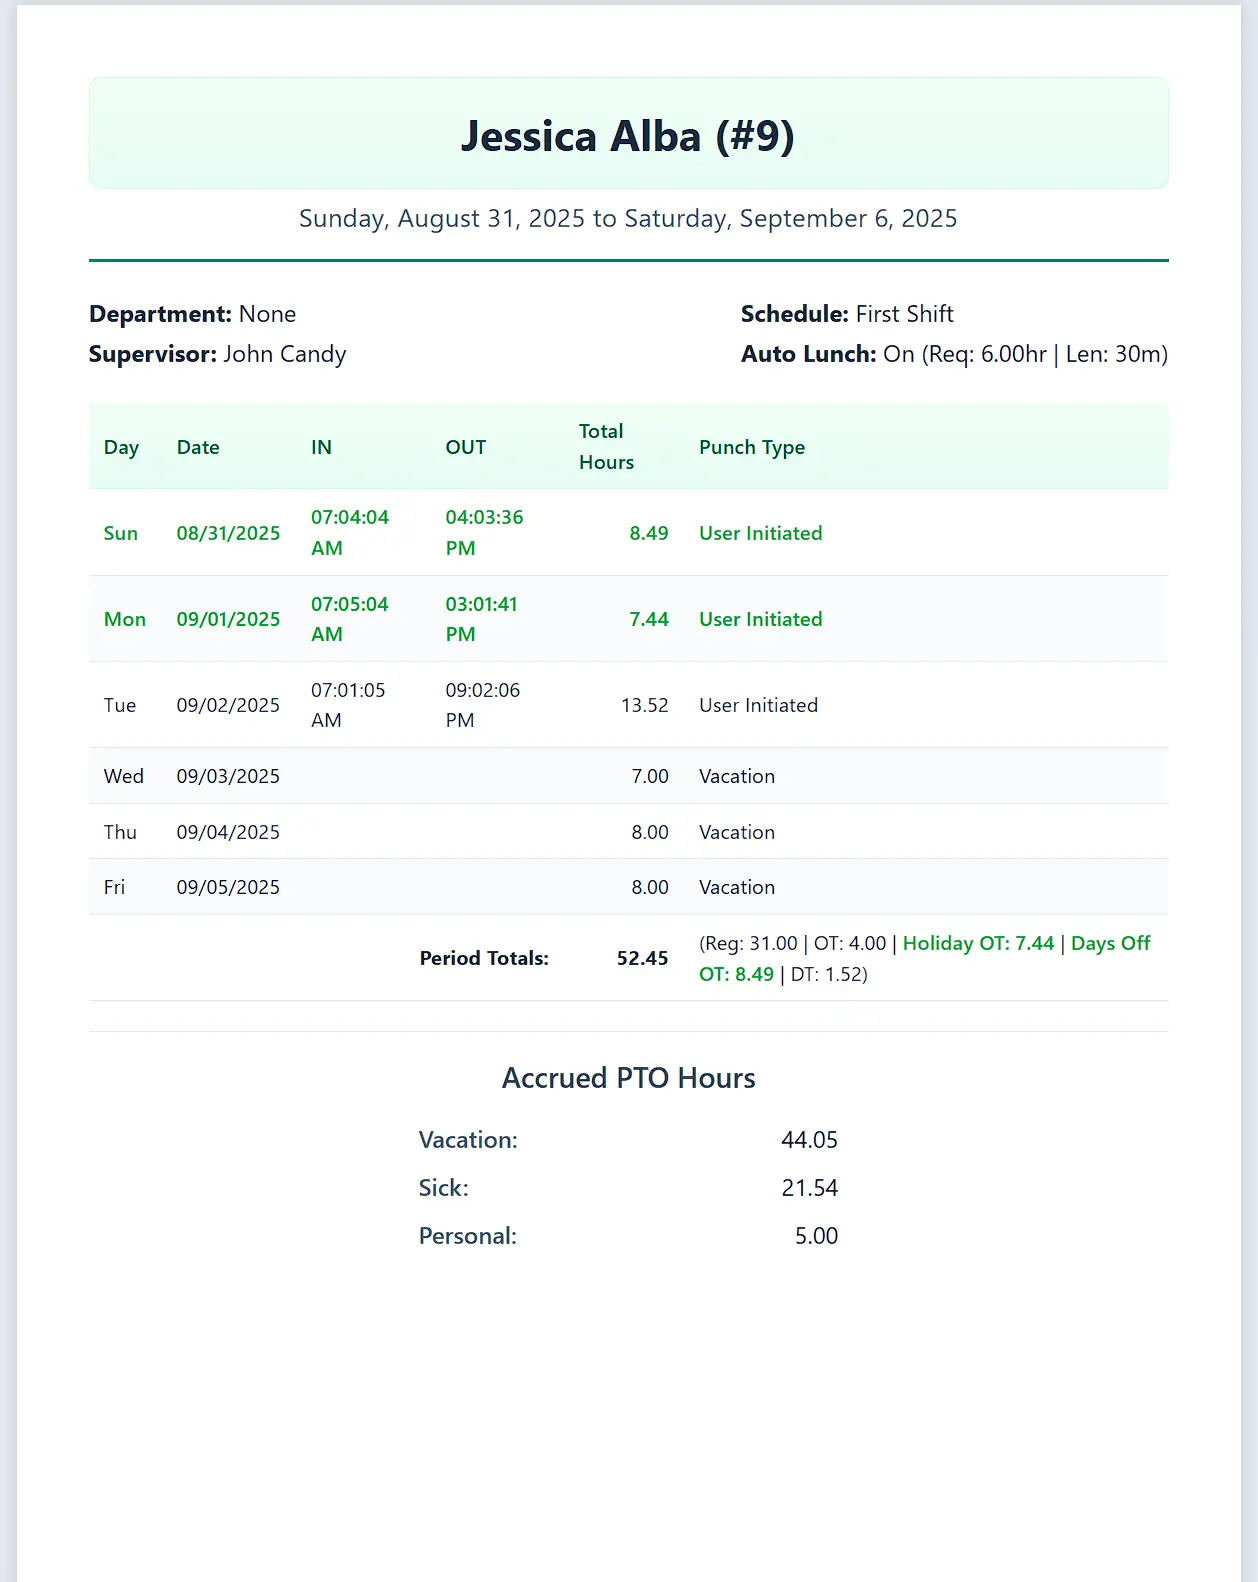
This report allows you to view and print the detailed time card for a single employee or all employees for the current pay period. It includes a daily breakdown of punches, total hours, and overtime.
- To Print All Time Cards: Navigate to the Reports > Time Card Reports -> All Time Cards page and click the
Print Allbutton to generate a printable document for every active employee. - Each Time Card will print on a separate page
- Time Cards can also be E-mailed to all employees using the
Email Allbutton - To Print an Individual Time Card: Navigate to Reports > Time Card Reports > Individual Time Card and select an employee.
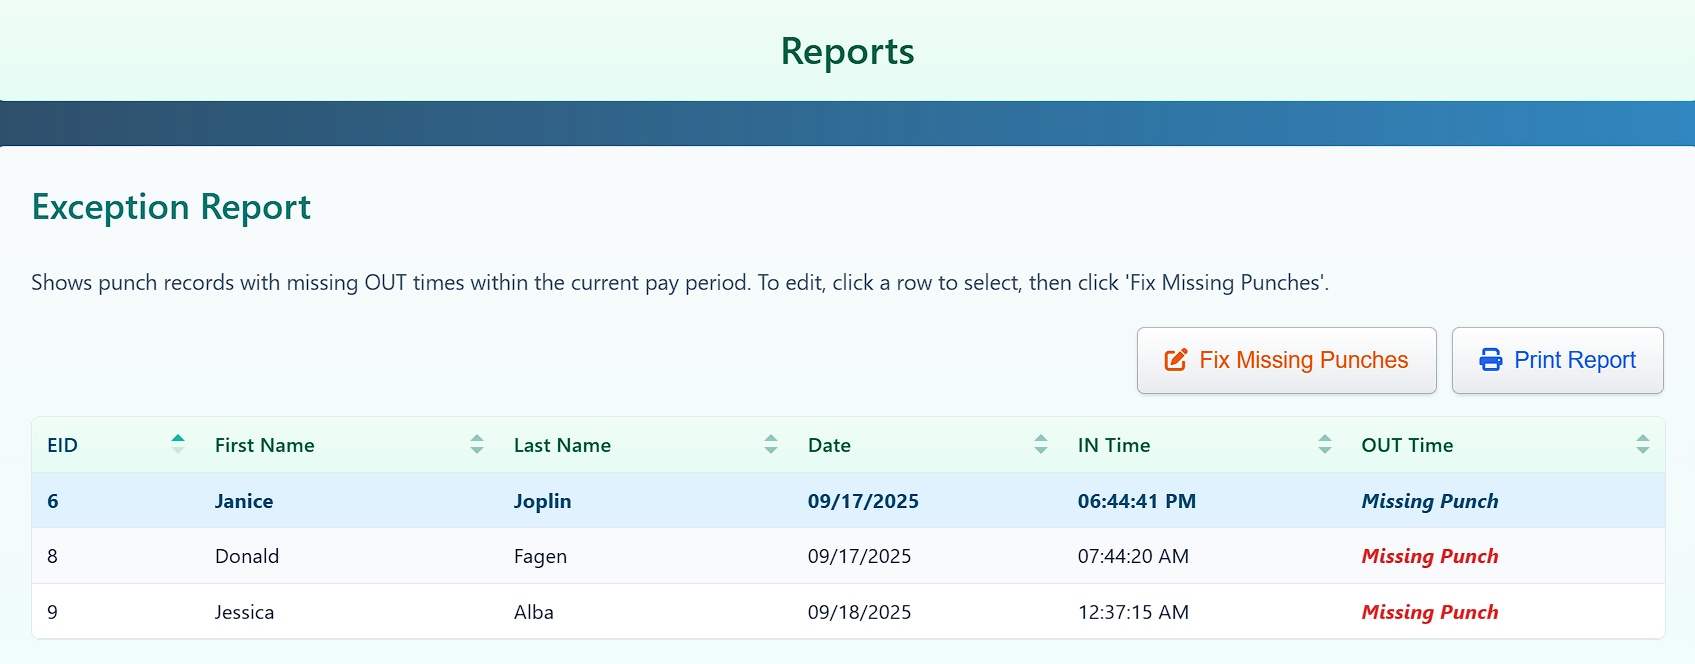
Exception Report
The Exception Report is a critical tool for ensuring payroll accuracy. It automatically finds and lists all punches that are missing an OUT time. All exceptions must be corrected before you can close the pay period.
- Accessing: Navigate to Reports select
Exception Report - Usage: Select a row and click
Fix Missing Punchesto resolve the error by entering the correct time.
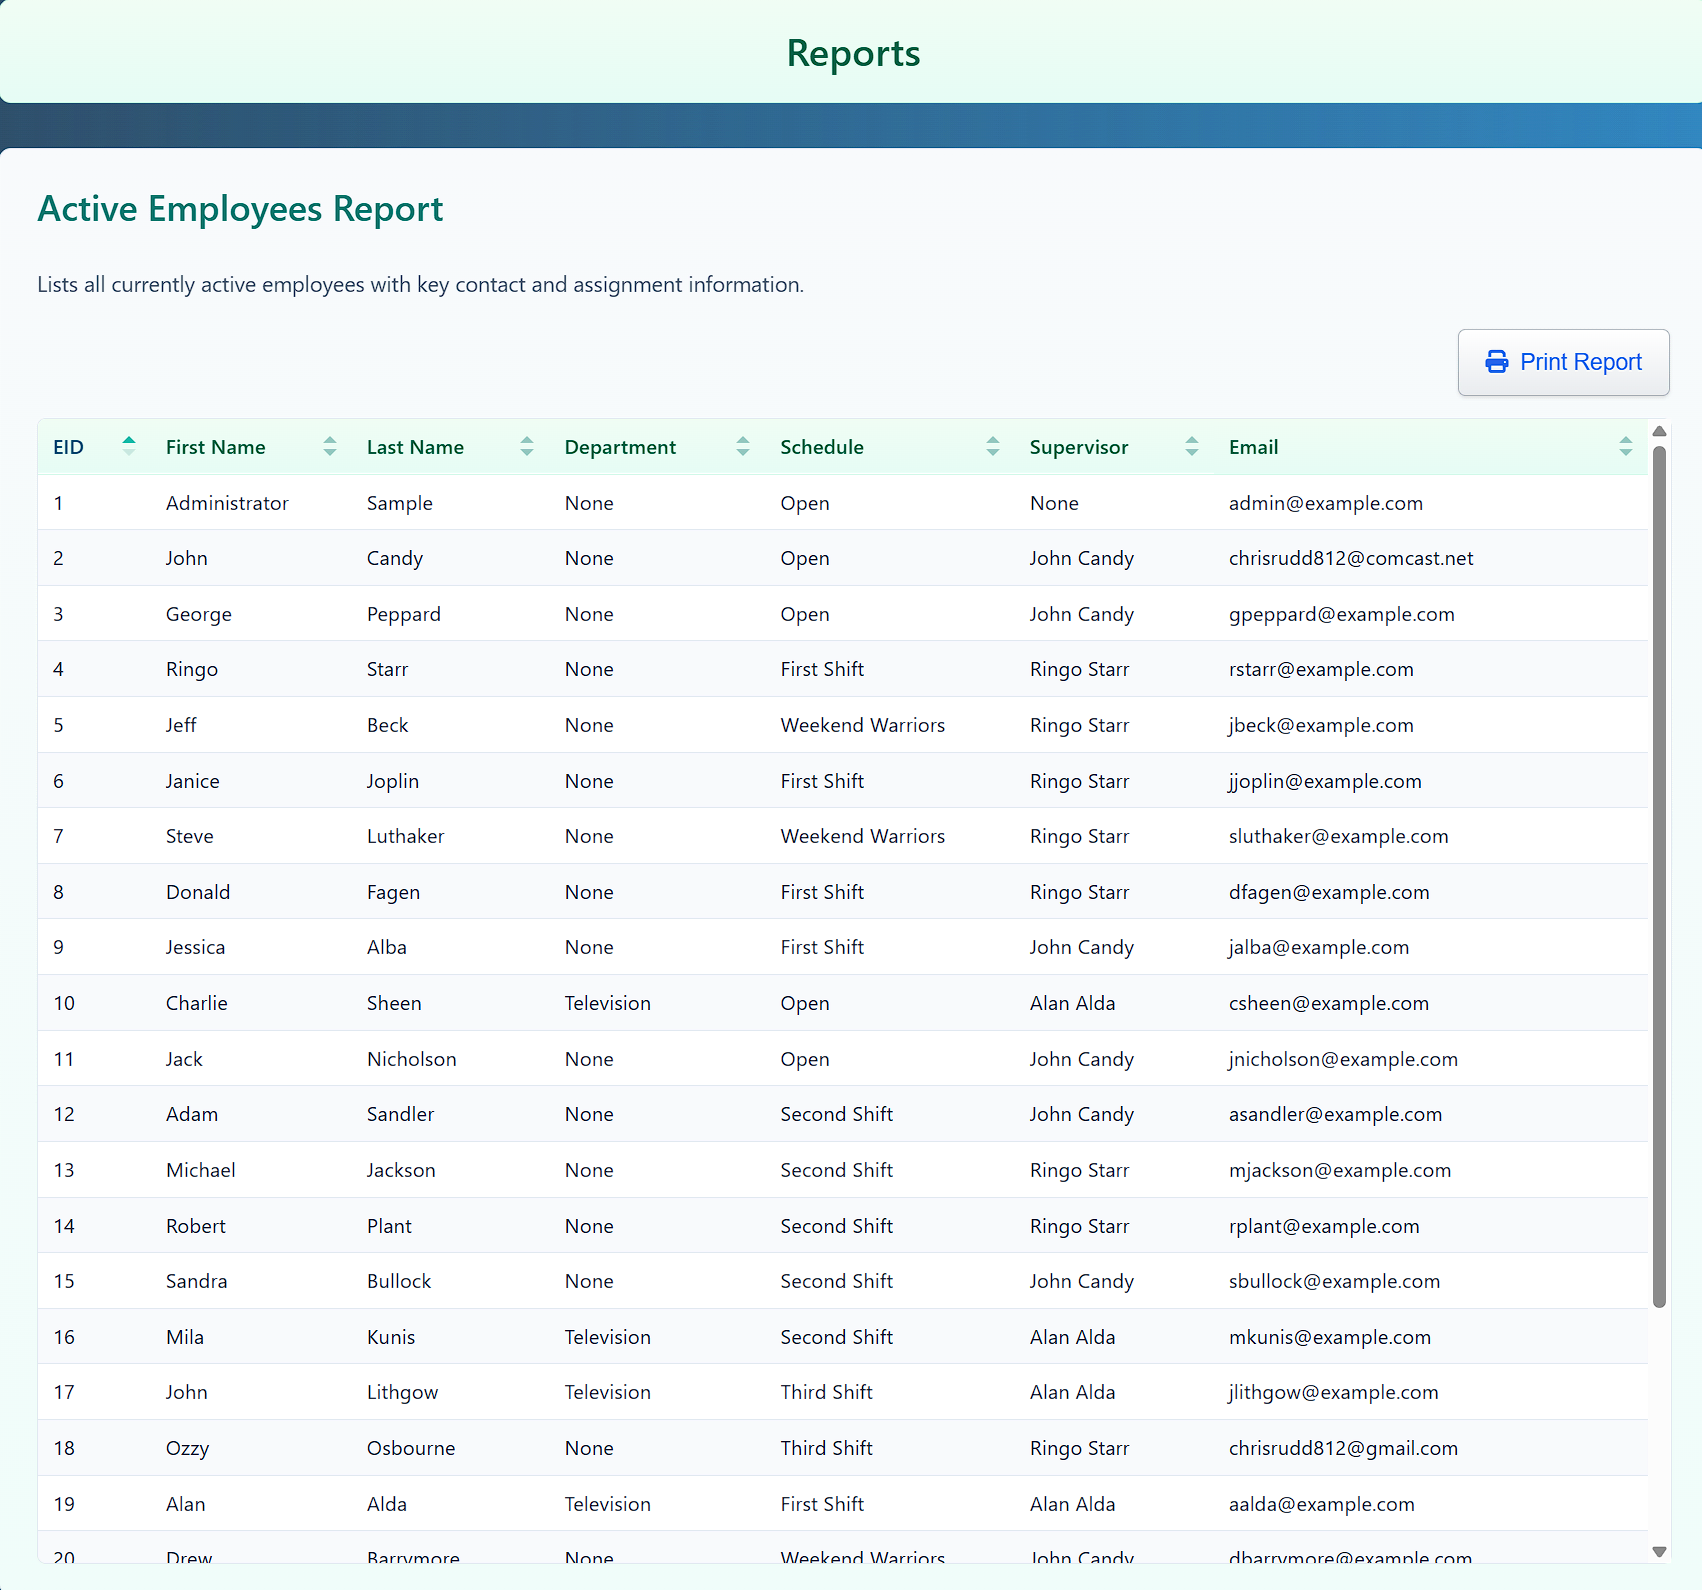
Employee Reports
The Employee Report provides a comprehensive list of all employees, both active and inactive. This is where you can manage employee statuses and view contact information.
- Accessing: Navigate to
Reports > Employee Reportsfrom the main navigation bar. - Features: You can filter the list to see employees by department, schedule or supervisor, only active or inactive employees, then use the Reactivate Employee button to return them to the active roster.
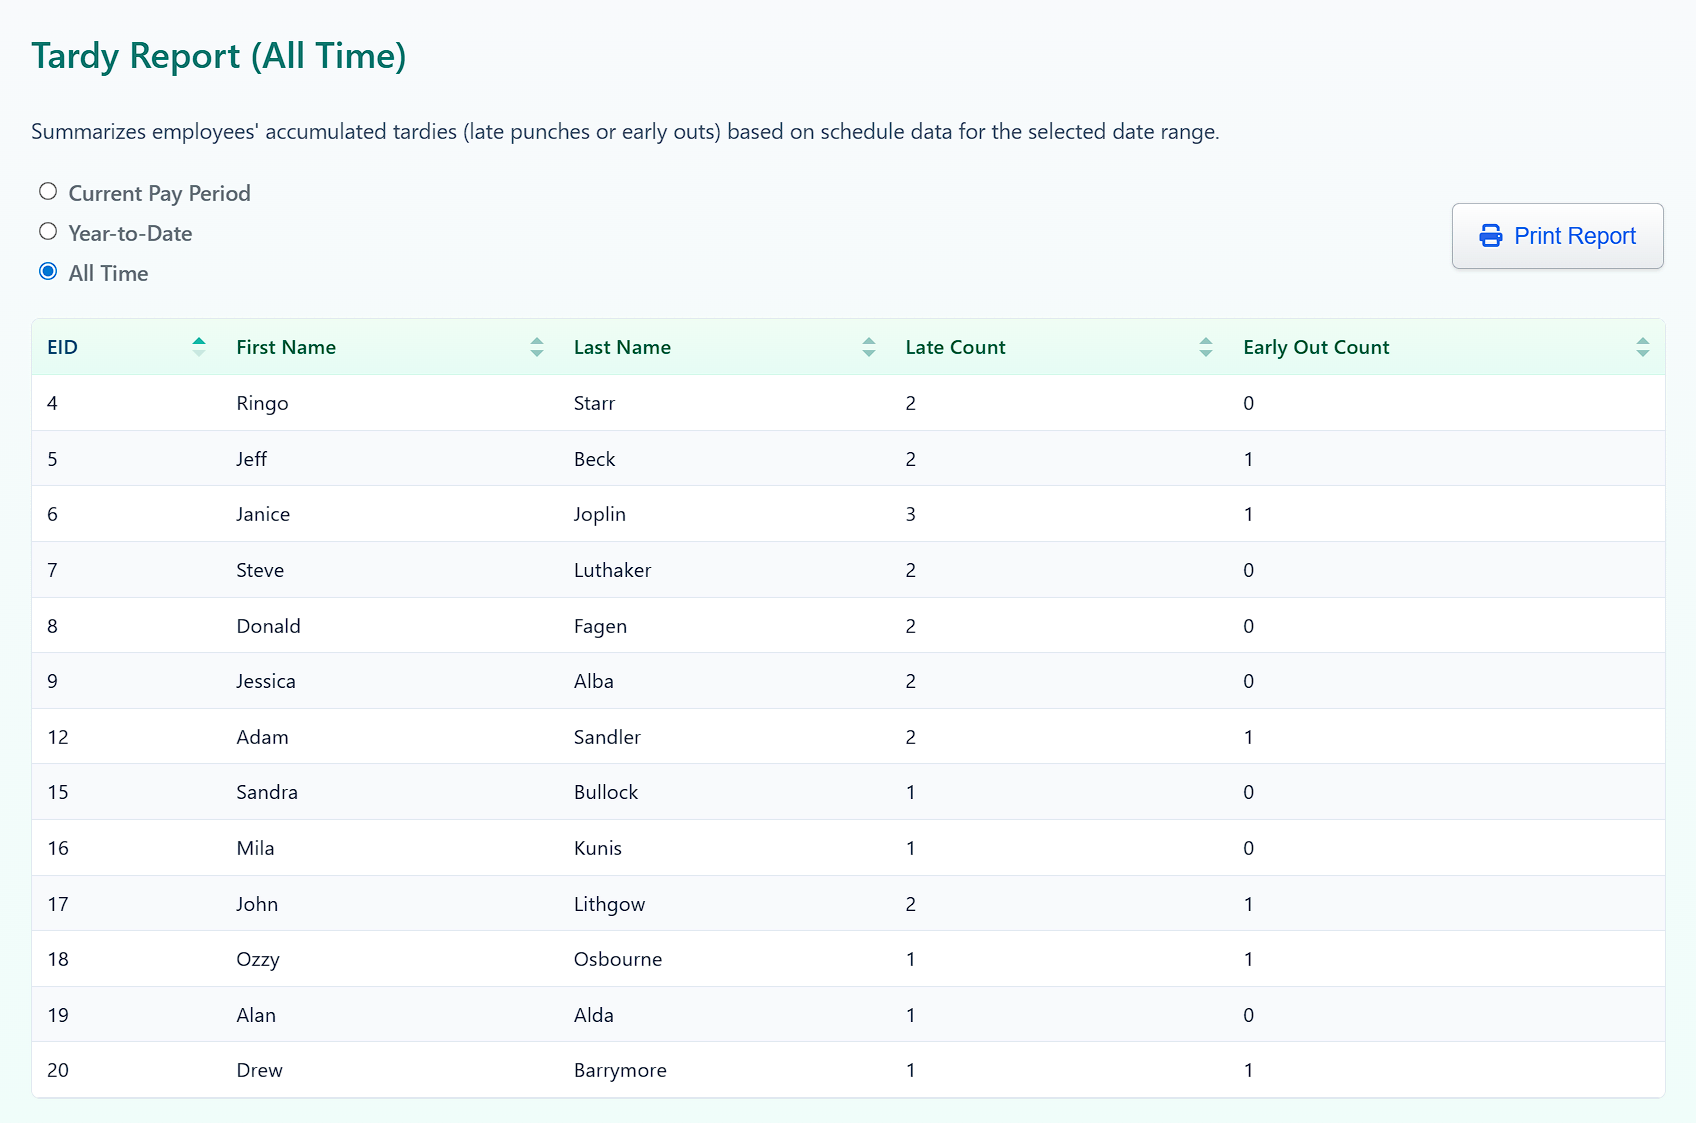
Tardy Report
The Tardy Report provides a comprehensive sortable list of all employees with their number of late punches or early outs. You can filter tardies by current pay period, YTD or All Time
- Accessing: Navigate to
Reports > Tardy Reportfrom the main navigation bar.
Other Reports
Who's IN Report
The Who's IN Report provides a list of all employees who are currently punched IN.
- Accessing: Navigate to
Reports > Who's IN Reportfrom the main navigation bar.
PTO Balance Report
The PTO Balance Report provides a comprehensive list of all employees with their current accrued PTO balances.
- Accessing: Navigate to
Reports
							> PTO Balance Report
from the main navigation bar.
System Access Report
The System Access Report provides a list of all users with Administrative Permissions, for auditing purposes.
- Accessing: Navigate to
Reports
							> System Access Report
from the main navigation bar.
Archived Punches Report
The Archived Punches Report provides a detailed list of all punches that have been archived after closing a pay period for auditing purposes.
- Accessing: Navigate to
Reports
							> Archived Punches
from the main navigation bar. - You can filter by All Employees, Individual Employee, Start and End Dates
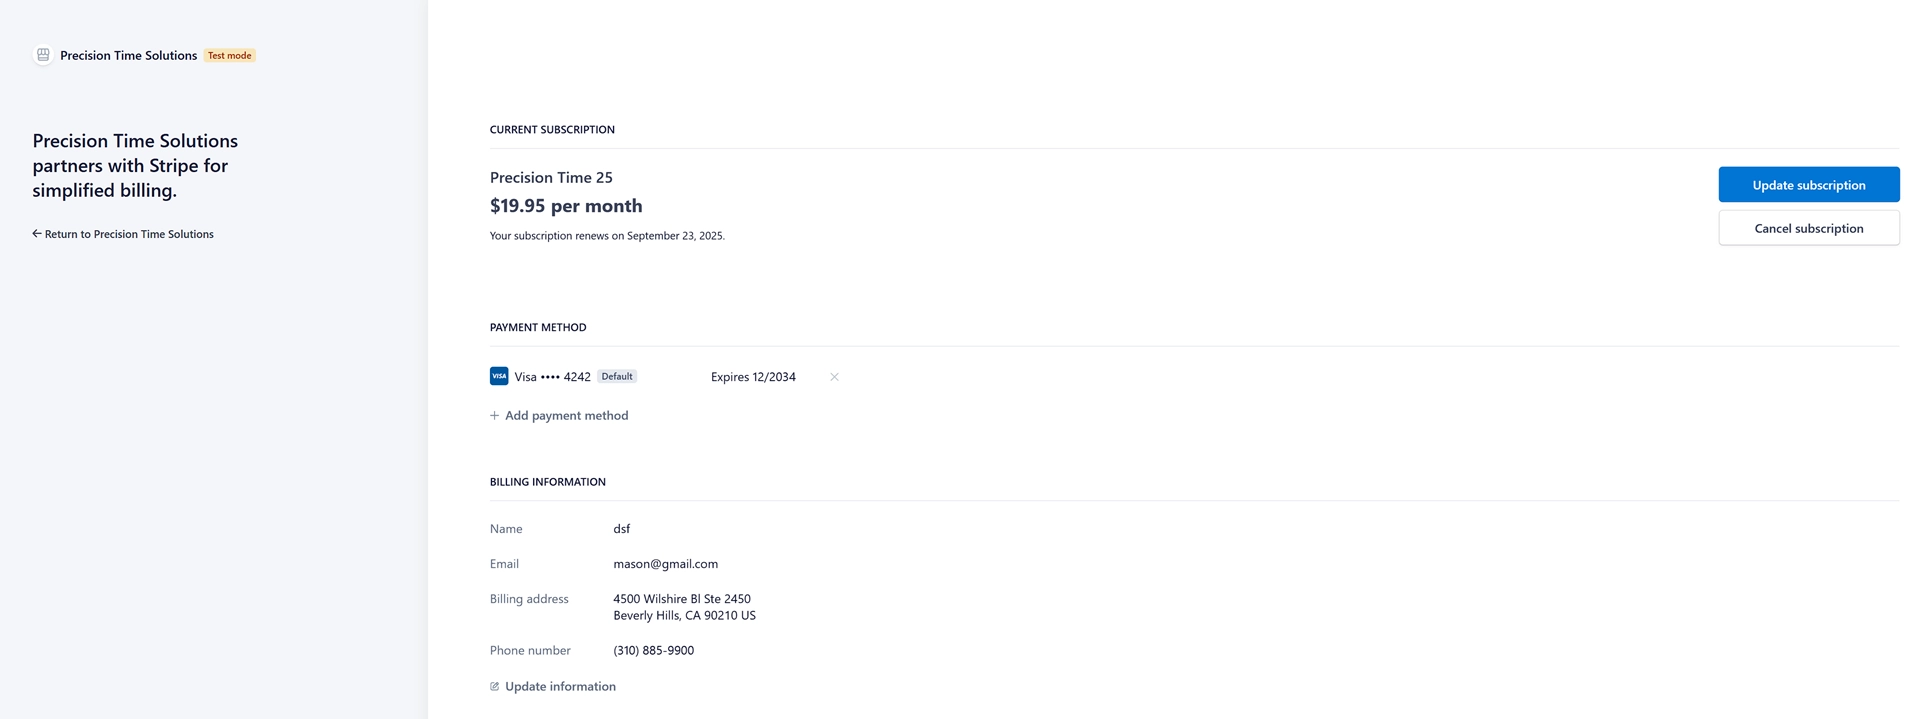
Account Settings
The Account page is for company-level administration, like managing your plan subscription and updating company info. Only the designated company admin can access these settings.
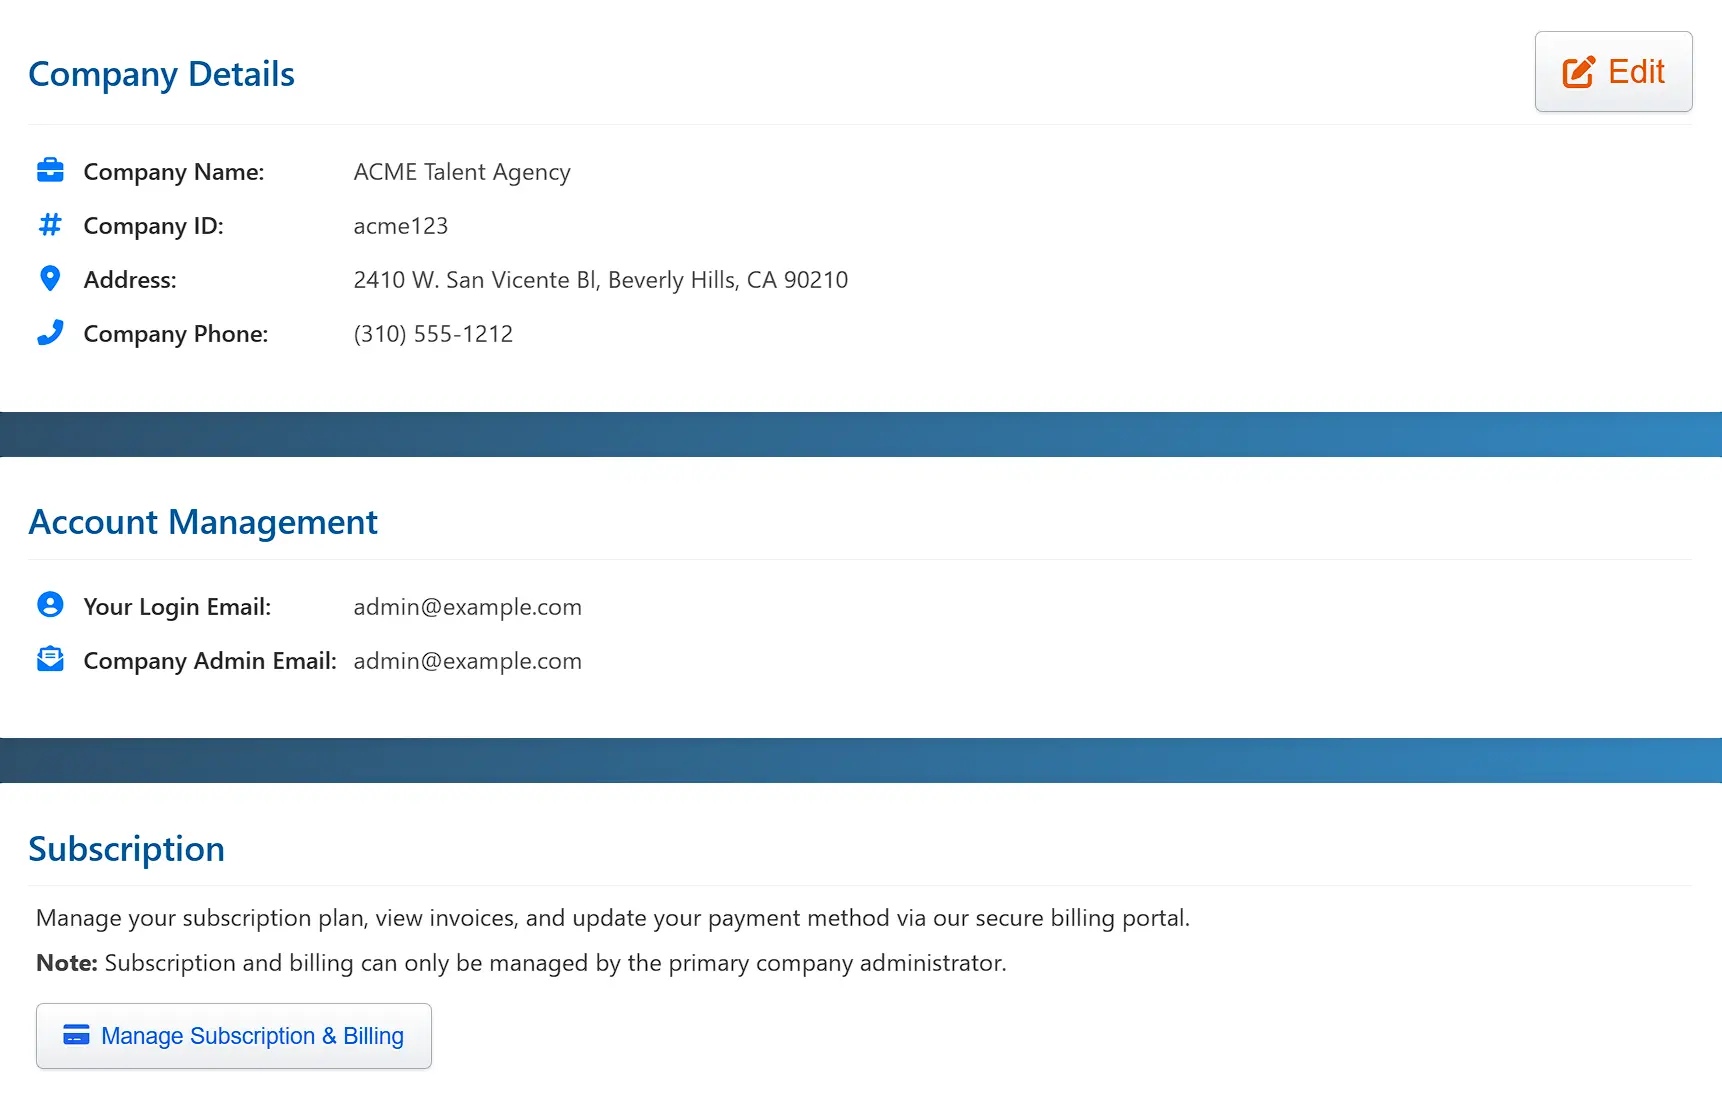
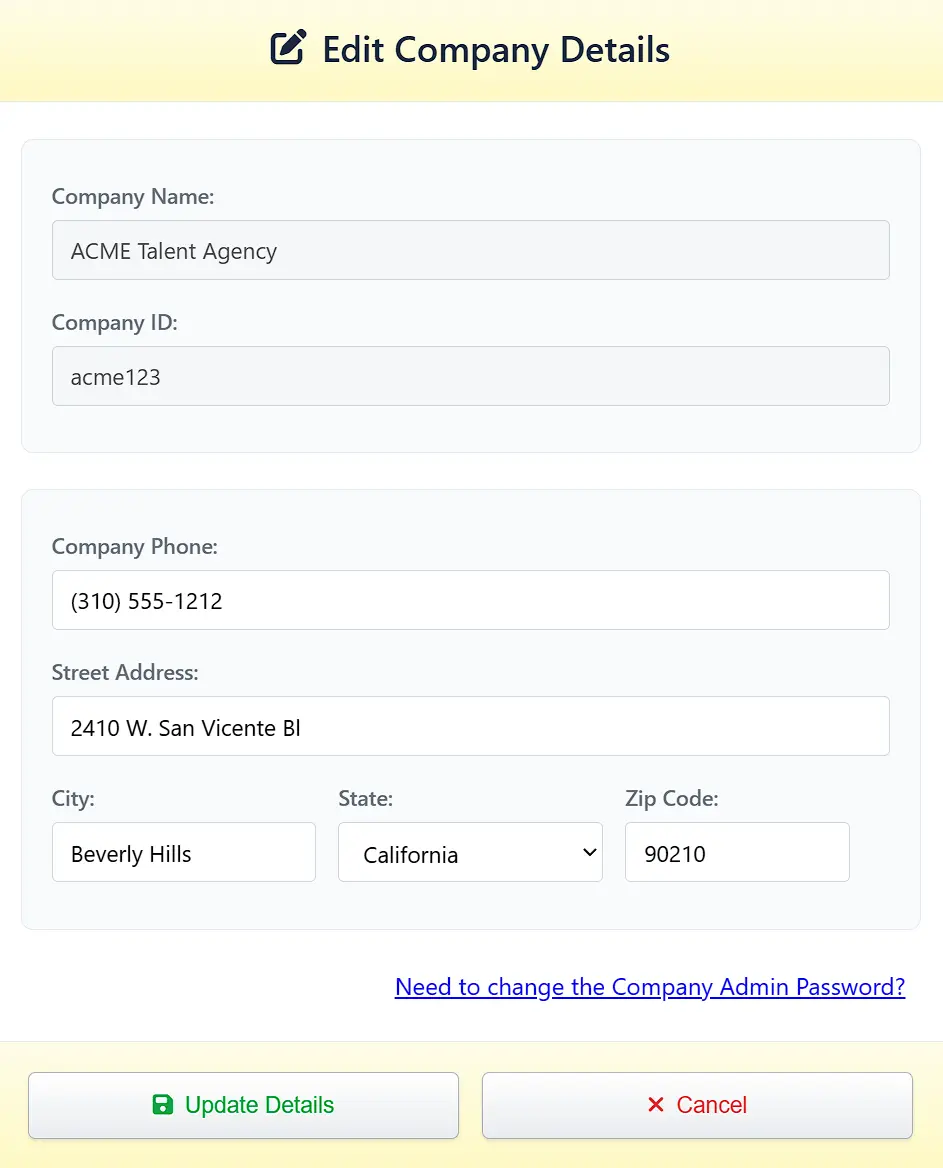
Click "Edit" to change company info. You will be required to enter the company admin user name and pasword.
Click "Manage Subscription and Billing" to change or cancel your subscription. Password credentials will be required.